Lanyon A Simple Blogger template

Free tutorials, courses, generative tools, and projects built with Javascript, PHP, Python, ML, AI,.Net, C#, Microsoft, Youtube, Github Code Download and more.

May 2020

Archive for May 2020

Continuous integration workflow template for .NET Core desktop apps with GitHub Actions

We know how time consuming it can be to quickly set up continuous integration and continuous deployment workflows (CI/CD) for your WPF and Windows Forms desktop applications.

That’s why, in cooperation with the GitHub Actions team, we have released a starter workflow in GitHub to help you quickly set up and showcase DevOps for your applications using the recently released GitHub Actions.

With GitHub Actions, you can quickly and easily automate your software workflows with CI/CD.

  • Integrate code changes directly into GitHub to speed up development cycles
  • Trigger builds to quickly identify build breaks and create testable debug builds
  • Continuously run tests to identify and eliminate bugs
  • Automatically sign, package and deploy branches that pass tests

The starter workflow template can be added directly to your project in a few simple steps, and with minimal configuration, allowing you to quickly set up a DevOps workflow in GitHub.

Like the .NET Core starter workflow template, this .NET Core Desktop template provides the commands to build and test your application on any of GitHub’s available hosted runner types, such as Windows, Mac OS or Ubuntu.

However, the WPF .NET Core starter workflow takes things a few steps further. For example, in addition to providing the steps to build and test your app, this workflow template details the steps necessary to securely use your signing certificate in a GitHub continuous integration pipeline. Furthermore, with this template, you will be able to generate a package of your app for testing or release, by leveraging a Windows Application Packaging Project.

To add the workflow:

  1. Navigate to the “Actions” tab in your GitHub project.
  2. Click the “New workflow” button.
  3. Select “Set up this workflow” in the “.NET Core Desktop” workflow.
  4. Commit the file to your repo.

Image github actions workflow template

Once added to your repo, follow the instructions to configure the workflow for your project!
If you have any questions or feedback, please file issues on GitHub.

The post Continuous integration workflow template for .NET Core desktop apps with GitHub Actions appeared first on .NET Blog.


source https://devblogs.microsoft.com/dotnet/continuous-integration-workflow-template-for-net-core-desktop-apps-with-github-actions/

Introducing YARP Preview 1

Introducing YARP Preview 1

YARP is a project to create a reverse proxy server. It started when we noticed a pattern of questions from internal teams at Microsoft who were either building a reverse proxy for their service or had been asking about APIs and technology for building one, so we decided to get them all together to work on a common solution, which has become YARP.

YARP is a reverse proxy toolkit for building fast proxy servers in .NET using the infrastructure from ASP.NET and .NET. The key differentiator for YARP is that it is being designed to be easily customized and tweaked to match the specific needs of each deployment scenario. YARP plugs into the ASP.NET pipeline for handling incoming requests, and then has its own sub-pipeline for performing the steps to proxy the requests to backend servers. Customers can add additional modules, or replace stock modules as needed.

With the basic infrastructure of the proxy now in place, we’ve produced the first official build of YARP (Preview 1) in order to better collaborate and get feedback.

What is in Preview 1

  • Core proxy infrastructure
  • Config-based route definitions
  • Pipeline model for extensibility
  • Forwarded Headers (hard coded)
  • Targeting both .NET Core 3.1 and .NET Core 5

What is not in Preview 1

  • Session Affinity #45
  • Forwarded Headers (configurable) #60
  • Code-based route definition & per-request routing #8, #46
  • Metrics & logging #61
  • Performance tweaks #51
  • Connection filtering #53
  • And much more – see the project board for more details

Getting started with YARP Preview 1

YARP is designed as a library that provides the core proxy functionality, that you can then customize by adding or replacing modules. For preview 1, YARP is being supplied as a nuget package and code snippets. We plan on having a project template, and pre-built exe in future previews.

  1. YARP works with either .NET Core 3.1 or .NET 5 preview 4 (or later). Download the preview 4 (or greater) of .NET 5 SDK from https://dotnet.microsoft.com/download/dotnet/5.0
  2. Create an “Empty” ASP.NET Core application using
    • dotnet new web -n MyProxy -f netcoreapp5.0 (or netcoreapp3.1 for .NET Core 3.1)
      Or
    • Create a new ASP.NET Core web application in Visual Studio, and choose “Empty” for the project template
  3. Open the Project and make sure it includes:
    <PropertyGroup>
      <TargetFramework>netcoreapp5.0</TargetFramework>
    </PropertyGroup>
    

    And

    <ItemGroup> 
      <PackageReference Include="Microsoft.ReverseProxy" Version="1.0.0-preview.1.*" /> 
    </ItemGroup>
    
  4. Startup.cs
    YARP is implemented as a ASP.NET Core component, and so the majority of the sample code is in Startup.cs.
    YARP currently uses configuration files to define the routes and endpoints for the proxy. That is loaded in the ConfigureServices method.
    public IConfiguration Configuration { get; }
    public Startup(IConfiguration configuration)
    {
        Configuration = configuration;
    }
    public void ConfigureServices(IServiceCollection services) 
    { 
        services.AddReverseProxy() 
            .LoadFromConfig(Configuration.GetSection("ReverseProxy")); 
    } 
    

    The configure method defines the ASP.NET pipeline for processing requests. The reverse proxy is plugged in to ASP.NET endpoint routing, and then has its own sub pipeline for the proxy. Here proxy pipeline modules, such as load balancing can be added to customize the handling of the request.

    /// <summary>
    /// This method gets called by the runtime. Use this method to configure the HTTP request pipeline.
    /// </summary>
    public void Configure(IApplicationBuilder app)
    {
        app.UseHttpsRedirection();
    
        app.UseRouting();
        app.UseAuthorization();
        app.UseEndpoints(endpoints =>
        {
            endpoints.MapControllers();
            endpoints.MapReverseProxy(proxyPipeline =>
            {
                proxyPipeline.UseProxyLoadBalancing();
            });
        });
    }
    
  5. Configuration

    The configuration for YARP is defined in JSON in the appsettings.json file. It defines a set of:

    • Backends – which are the clusters of servers that requests can be routed to
      • The destination name is an identifier that is used in metrics, logging and for session affinity.
      • Address is the URI prefix that will have the original request path appended to it
    • Routes – which map incoming requests to the backend clusters based on aspects of the request such as host name, path, method, request headers etc.
      Routes are ordered, so the app1 route needs to be defined first as route2 will act as a catchall for all paths that have not already been matched.

      The following needs to be a peer to the Logging and AllowedHosts sections.

        "ReverseProxy": {
          "Routes": [
            {
              "RouteId": "app1",
              "BackendId": "backend1",
              "Match": {
                "Methods": [ "GET", "POST" ],
                "Host": "localhost",
                "Path": "/app1/"
              }
            },
            {
              "RouteId": "route2",
              "BackendId": "backend2",
              "Match": {
                "Host": "localhost"
              }
            }
          ],
          "Backends": {
            "backend1": {
              "LoadBalancing": {
                "Mode": "Random"
              },
              "Destinations": {
                "backend1_destination1": {
                  "Address": "https://example.com:10000/"
                },
                "backend1_destination2": {
                  "Address": "http://example.com"10001/"
                }
              }
            },
            "backend2": {
              "Destinations": {
                "backend2_destination1": {
                  "Address": "https://example.com:10002/"
                }
              }
            }
          }
        }
      

Survey

We are interested to see how you are currently using a reverse proxy and what problems we need to solve with this project. We’d appreciate your input here.

Code Feedback

If you have feature suggestions, changes, bugs etc, please provide feedback using the issue templates in the project repo. We welcome contributions, please see contibuting.md for more details.

The post Introducing YARP Preview 1 appeared first on .NET Blog.


source https://devblogs.microsoft.com/dotnet/introducing-yarp-preview-1/

Introducing Project Tye

Project Tye

Project Tye is an experimental developer tool that makes developing, testing, and deploying microservices and distributed applications easier.

When building an app made up of multiple projects, you often want to run more than one at a time, such as a website that communicates with a backend API or several services all communicating with each other. Today, this can be difficult to setup and not as smooth as it could be, and it’s only the very first step in trying to get started with something like building out a distributed application. Once you have an inner-loop experience there is then a, sometimes steep, learning curve to get your distributed app onto a platform such as Kubernetes.

The project has two main goals:

  1. Making development of microservices easier by:
    • Running many services with one command
    • Using dependencies in containers
    • Discovering addresses of other services using simple conventions
  2. Automating deployment of .NET applications to Kubernetes by:
    • Automatically containerizing .NET applications
    • Generating Kubernetes manifests with minimal knowledge or configuration
    • Using a single configuration file

If you have an app that talks to a database, or an app that is made up of a couple of different processes that communicate with each other, then we think Tye will help ease some of the common pain points you’ve experienced.

We have recently demonstrated Tye in a few Build sessions that we encourage you to watch, Cloud Native Apps with .NET and AKS and Journey to one .NET

Tour of Tye

Installation

To get started with Tye, you will first need to have .NET Core 3.1 installed on your machine.

Tye can then be installed as a global tool using the following command:

dotnet tool install -g Microsoft.Tye --version "0.2.0-alpha.20258.3"

Running a single service

Tye makes it very easy to run single applications. To demonstrate this:

1. Make a new folder called microservices and navigate to it:

mkdir microservices
cd microservices

2. Then create a frontend project:

dotnet new razor -n frontend

3. Now run this project using tye run:

tye run frontend

Image tye run output 
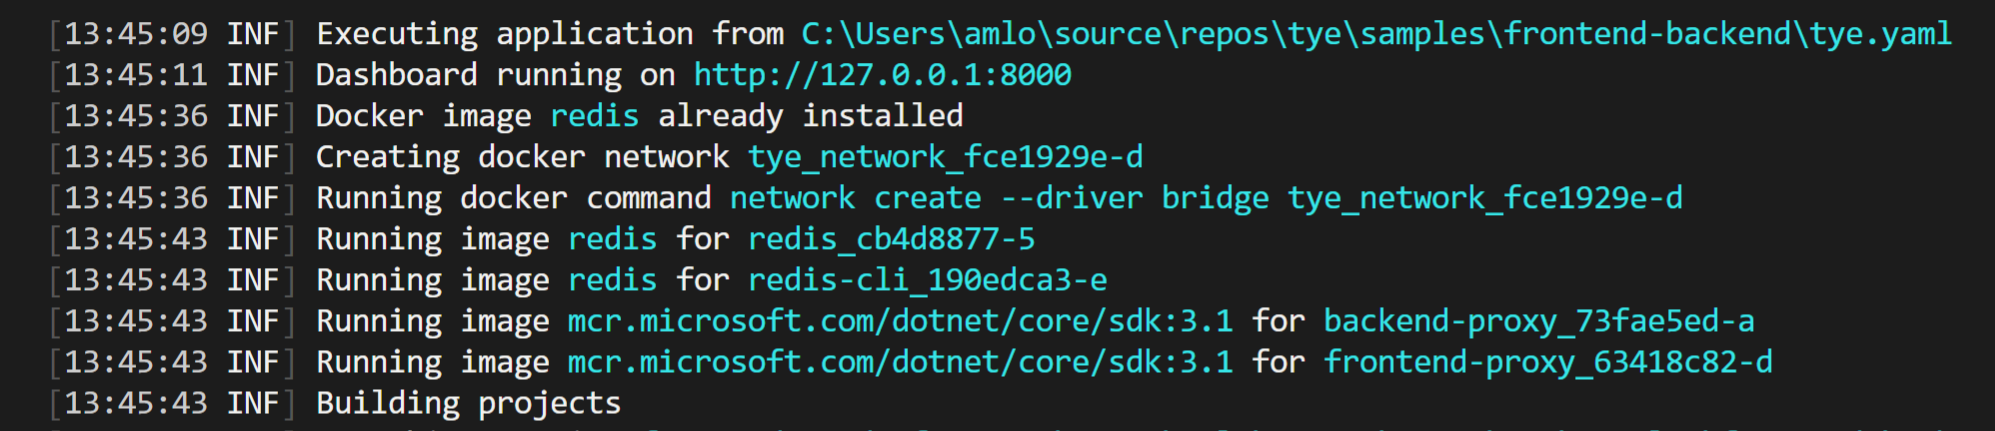
The above displays how Tye is building, running, and monitoring the frontend application.

One key feature from tye run is a dashboard to view the state of your application. Navigate to http://localhost:8000 to see the dashboard running.

Image tye dashboard

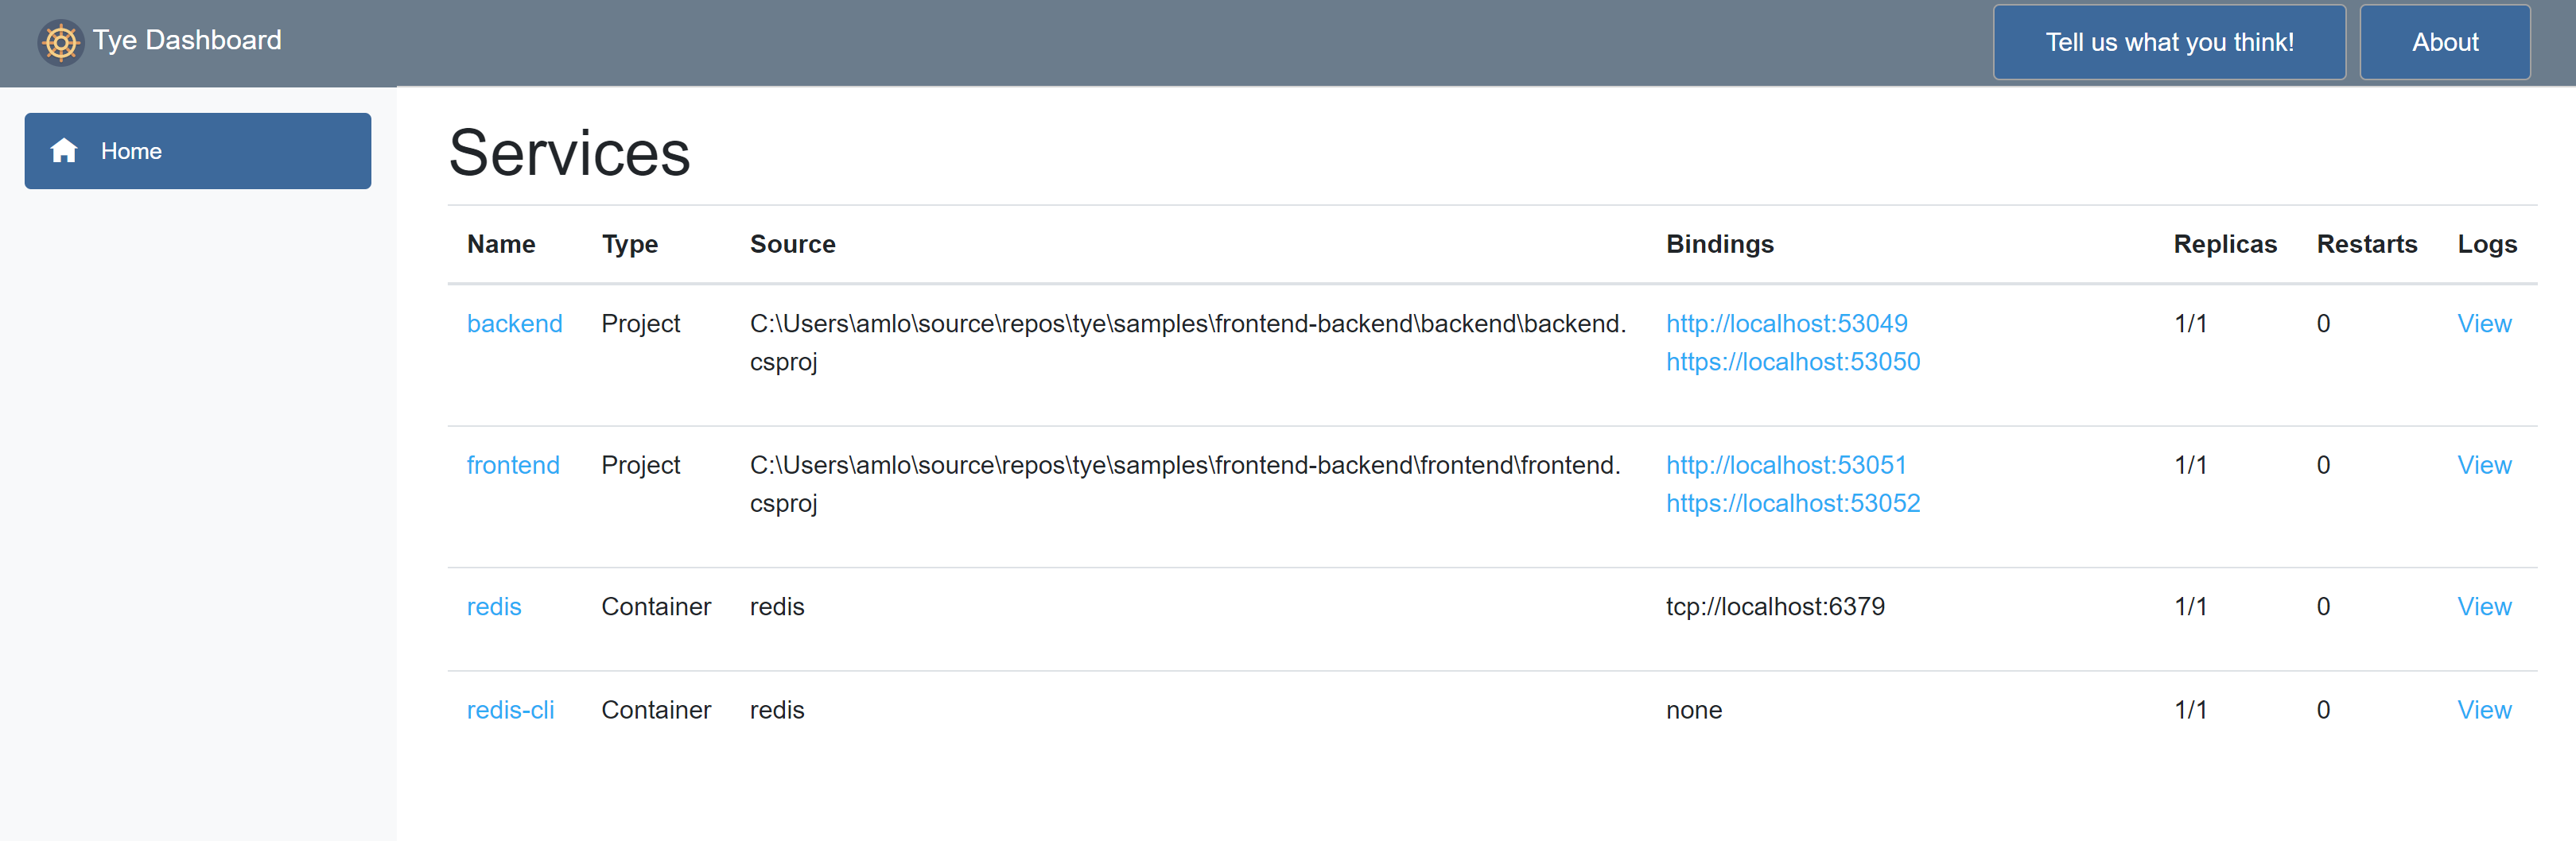
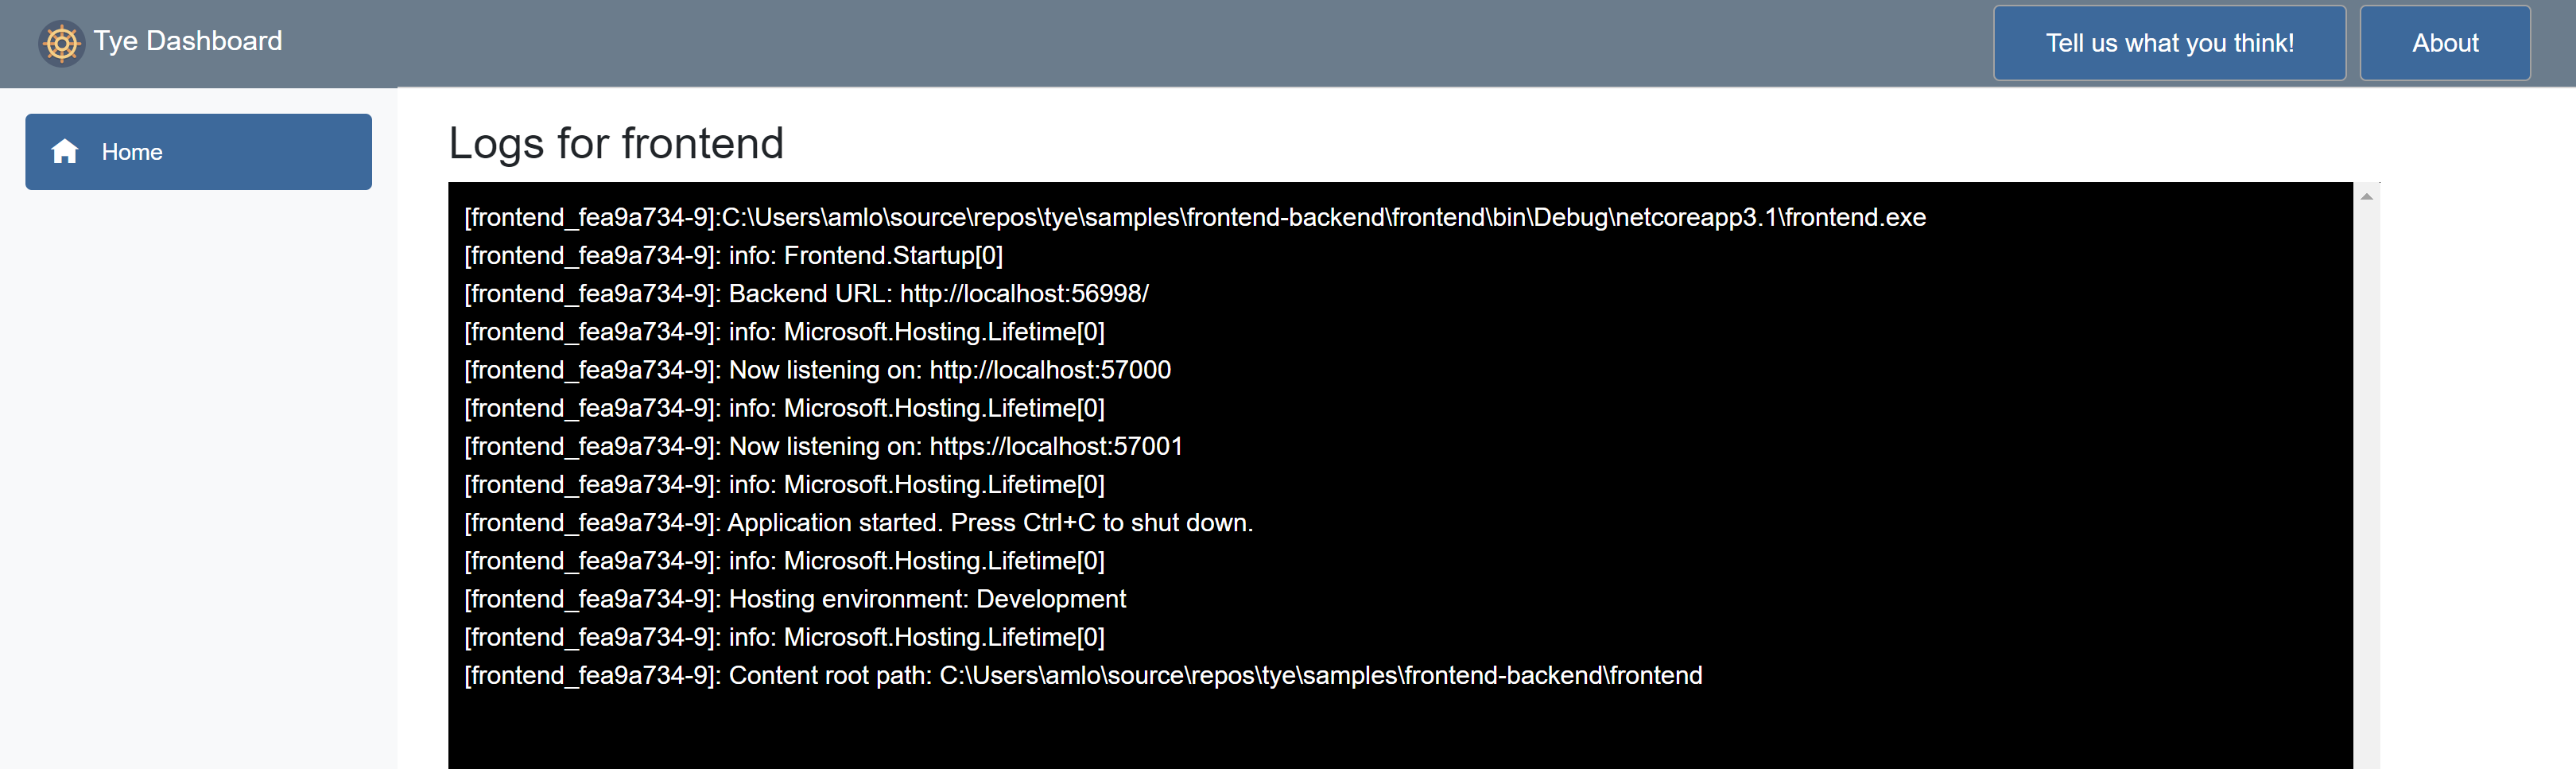
The dashboard is the UI for Tye that displays a list of all of your services. The Bindings column has links to the listening URLs of the service. The Logs column allows you to view the streaming logs for the service.

Image tye logs

Services written using ASP.NET Core will have their listening ports assigned randomly if not explicitly configured. This is useful to avoid common issues like port conflicts.

Running multiple services

Instead of just a single application, suppose we have a multi-application scenario where our frontend project now needs to communicate with a backend project. If you haven’t already, stop the existing tye run command using Ctrl + C.

1. Create a backend API that the frontend will call inside of the microservices/ folder.

dotnet new webapi -n backend

2. Then create a solution file and add both projects:

dotnet new sln
dotnet sln add frontend backend

You should now have a solution called microservices.sln that references the frontend and backend projects.

3. Run tye in the folder with the solution.

tye run

The dashboard should show both the frontend and backend services. You can navigate to both of them through either the dashboard of the url outputted by tye run.

The backend service in this example was created using the webapi project template and will return an HTTP 404 for its root URL.

Getting the frontend to communicate with the backend

Now that we have two applications running, let’s make them communicate.

To get both of these applications communicating with each other, Tye utilizes service discovery. In general terms, service discovery describes the process by which one service figures out the address of another service. Tye uses environment variables for specifying connection strings and URIs of services.

The simplest way to use Tye’s service discovery is through the Microsoft.Extensions.Configuration system – available by default in ASP.NET Core or .NET Core Worker projects. In addition to this, we provide the Microsoft.Tye.Extensions.Configuration package with some Tye-specific extensions layered on top of the configuration system.

If you want to learn more about Tye’s philosophy on service discovery and see detailed usage examples, check out this reference document.

1. If you haven’t already, stop the existing tye run command using Ctrl + C. Open the solution in your editor of choice.

2. Add a file WeatherForecast.cs to the frontend project.

using System;

namespace frontend
 {
   public class WeatherForecast
   {
     public DateTime Date { get; set; }

     public int TemperatureC { get; set; }

     public int TemperatureF => 32 + (int)(TemperatureC / 0.5556);

     public string Summary { get; set; }
   }
 }

This will match the backend WeatherForecast.cs.

3. Add a file WeatherClient.cs to the frontend project with the following contents:

using System.Net.Http;
using System.Text.Json;
using System.Threading.Tasks;

namespace frontend
{
   public class WeatherClient
   {
      private readonly JsonSerializerOptions options = new JsonSerializerOptions()
      {
         PropertyNameCaseInsensitive = true,
         PropertyNamingPolicy = JsonNamingPolicy.CamelCase,
      };

      private readonly HttpClient client;

      public WeatherClient(HttpClient client)
      {
         this.client = client;
      }

      public async Task<WeatherForecast[]> GetWeatherAsync()
      {
         var responseMessage = await this.client.GetAsync("/weatherforecast");
         var stream = await responseMessage.Content.ReadAsStreamAsync();
         return await JsonSerializer.DeserializeAsync<WeatherForecast[]>(stream, options);
      }
   }
}

4. Add a reference to the Microsoft.Tye.Extensions.Configuration package to the frontend project

dotnet add frontend/frontend.csproj package Microsoft.Tye.Extensions.Configuration  --version "0.2.0-*"

5. Now register this client in frontend by adding the following to the existing ConfigureServices method to the existing Startup.cs file:

...
public void ConfigureServices(IServiceCollection services)
{
   services.AddRazorPages();
   /** Add the following to wire the client to the backend **/
   services.AddHttpClient<WeatherClient>(client =>
   {
      client.BaseAddress = Configuration.GetServiceUri("backend");
   });
   /** End added code **/
}
...

This will wire up the WeatherClient to use the correct URL for the backend service.

6. Add a Forecasts property to the Index page model under Pages\Index.cshtml.cs in the frontend project.

...
  public WeatherForecast[] Forecasts { get; set; }
...

7. Change the OnGet method to take the WeatherClient to call the backend service and store the result in the Forecasts property:

...
 public async Task OnGet([FromServices]WeatherClient client)
 {
   Forecasts = await client.GetWeatherAsync();
 }
...

8. Change the Index.cshtml razor view to render the Forecasts property in the razor page:

@page
@model IndexModel
@{
   ViewData["Title"] = "Home page";
}

<div class="text-center">
   <h1 class="display-4">Welcome</h1>
   <p>Learn about <a href="https://docs.microsoft.com/aspnet/core">building Web apps with ASP.NET Core</a>.</p>
</div>

Weather Forecast:

<table class="table">
   <thead>
      <tr>
         <th>Date</th>
         <th>Temp. (C)</th>
         <th>Temp. (F)</th>
         <th>Summary</th>
      </tr>
   </thead>
   <tbody>
      @foreach (var forecast in @Model.Forecasts)
      {
         <tr>
            <td>@forecast.Date.ToShortDateString()</td>
            <td>@forecast.TemperatureC</td>
            <td>@forecast.TemperatureF</td>
            <td>@forecast.Summary</td>
         </tr>
      }
   </tbody>
</table>

9. Run the project with tye run and the frontend service should be able to successfully call the backend service!

When you visit the frontend service you should see a table of weather data. This data was produced randomly in the backend service. The fact that you’re seeing it in a web UI in the frontend means that the services are able to communicate. Unfortunately, this doesn’t work out of the box on Linux right now due to how self-signed certificates are handled, please see the workaround here

Tye’s configuration schema

Tye has a optional configuration file (tye.yaml) to enable customizing settings. This file contains all of your projects and external dependencies. If you have an existing solution, Tye will automatically populate this with all of your current projects.

To initalize this file, you will need to run the following command in the microservices directory to generate a default tye.yaml file:

tye init

The contents of the tye.yaml should look like this:

Image tye yaml

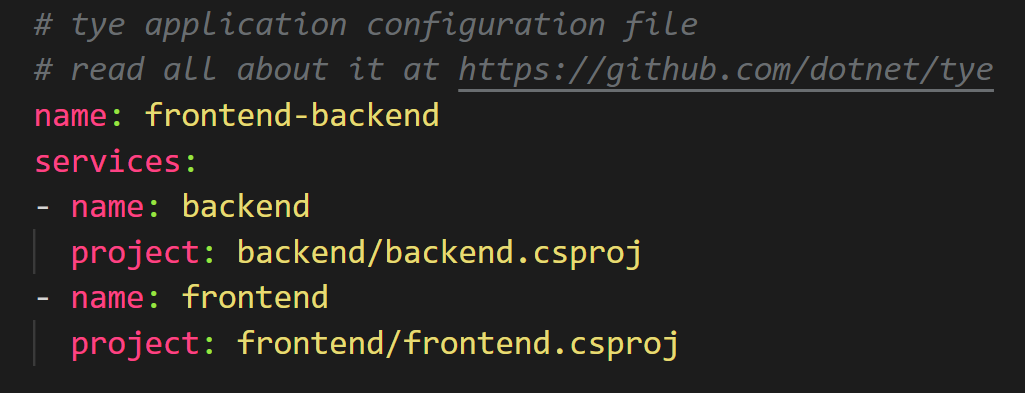
The top level scope (like the name node) is where global settings are applied.

tye.yaml lists all of the application’s services under the services node. This is the place for per-service configuration.

To learn more about Tye’s yaml specifications and schema, you can check it out here in Tye’s repository on Github.

We provide a json-schema for tye.yaml and some editors support json-schema for completion and validation of yaml files. See json-schema for instructions.

Adding external dependencies (Redis)

Not only does Tye make it easy to run and deploy your applications to Kubernetes, it’s also fairly simple to add external dependencies to your applications as well. We will now add redis to the frontend and backend application to store data.

Tye can use Docker to run images that run as part of your application. Make sure that Docker is installed on your machine.

1. Change the WeatherForecastController.Get() method in the backend project to cache the weather information in redis using an IDistributedCache.

2. Add the following using‘s to the top of the file:

using Microsoft.Extensions.Caching.Distributed;
using System.Text.Json;

3. Update Get():

[HttpGet]
public async Task<string> Get([FromServices]IDistributedCache cache)
{
   var weather = await cache.GetStringAsync("weather");

   if (weather == null)
   {
      var rng = new Random();
      var forecasts = Enumerable.Range(1, 5).Select(index => new WeatherForecast
      {
         Date = DateTime.Now.AddDays(index),
         TemperatureC = rng.Next(-20, 55),
         Summary = Summaries[rng.Next(Summaries.Length)]
      })
      .ToArray();

      weather = JsonSerializer.Serialize(forecasts);

      await cache.SetStringAsync("weather", weather, new DistributedCacheEntryOptions
      {
         AbsoluteExpirationRelativeToNow = TimeSpan.FromSeconds(5)
      });
   }
   return weather;
}

This will store the weather data in Redis with an expiration time of 5 seconds.

4. Add a package reference to Microsoft.Extensions.Caching.StackExchangeRedis in the backend project:

cd backend/
dotnet add package Microsoft.Extensions.Caching.StackExchangeRedis
cd ..

5. Modify Startup.ConfigureServices in the backend project to add the redis IDistributedCache implementation.

  public void ConfigureServices(IServiceCollection services)
  {
    services.AddControllers();

    services.AddStackExchangeRedisCache(o =>
    {
      o.Configuration = Configuration.GetConnectionString("redis");
     });
   }

The above configures redis to the configuration string for the redis service injected by the tye host.

6. Modify tye.yaml to include redis as a dependency.

name: microservice
services:
- name: backend
  project: backend\backend.csproj
- name: frontend
  project: frontend\frontend.csproj
- name: redis
  image: redis
  bindings:
  - port: 6379
    connectionString: "${host}:${port}"
- name: redis-cli
  image: redis
  args: "redis-cli -h redis MONITOR"

We’ve added 2 services to the tye.yaml file. The redis service itself and a redis-cli service that we will use to watch the data being sent to and retrieved from redis.

The "${host}:${port}" format in the connectionString property will substitute the values of the host and port number to produce a connection string that can be used with StackExchange.Redis.

7. Run the tye command line in the solution root

Make sure your command-line is in the microservices/ directory. One of the previous steps had you change directories to edit a specific project.

tye run

Navigate to http://localhost:8000 to see the dashboard running. Now you will see both redis and the redis-cli running listed in the dashboard.

Navigate to the frontend application and verify that the data returned is the same after refreshing the page multiple times. New content will be loaded every 5 seconds, so if you wait that long and refresh again, you should see new data. You can also look at the redis-cli logs using the dashboard and see what data is being cached in redis.

The "${host}:${port}" format in the connectionString property will substitute the values of the host and port number to produce a connection string that can be used with StackExchange.Redis.

Deploying to Kubernetes

Tye makes the process of deploying your application to Kubernetes very simple with minimal knowlege or configuration required.

Tye will use your current credentials for pushing Docker images and accessing Kubernetes clusters. If you have configured kubectl with a context already, that’s what tye deploy is going to use!

Prior to deploying your application, make sure to have the following:

  1. Docker installed based off on your operating system
  2. A container registry. Docker by default will create a container registry on DockerHub. You could also use Azure Container Registry (ACR) or another container registry of your choice.
  3. A Kubernetes Cluster. There are many different options here, including:

If you choose a container registry provided by a cloud provider (other than Dockerhub), you will likely have to take some steps to configure your kubernetes cluster to allow access. Follow the instructions provided by your cloud provider.

Deploying Redis

tye deploy will not deploy the redis configuration, so you need to deploy it first by running:

kubectl apply -f https://raw.githubusercontent.com/dotnet/tye/master/docs/tutorials/hello-tye/redis.yaml

This will create a deployment and service for redis.

Tye deploy

You can deploy your application by running the follow command:

tye deploy --interactive

Enter the Container Registry (ex: example.azurecr.io for Azure or example for dockerhub):

You will be prompted to enter your container registry. This is needed to tag images, and to push them to a location accessible by kubernetes.

Image tye deploy output

If you are using dockerhub, the registry name will be your dockerhub username. If you are using a standalone container registry (for instance from your cloud provider), the registry name will look like a hostname, eg: example.azurecr.io.

You’ll also be prompted for the connection string for redis.

Image redis connection string

Enter the following to use the instance that you just deployed:

redis:6379

tye deploy will create Kubernetes secret to store the connection string.

–interactive is needed here to create the secret. This is a one-time configuration step. In a CI/CD scenario you would not want to have to specify connection strings over and over, deployment would rely on the existing configuration in the cluster.

Tye uses Kubernetes secrets to store connection information about dependencies like redis that might live outside the cluster. Tye will automatically generate mappings between service names, binding names, and secret names.

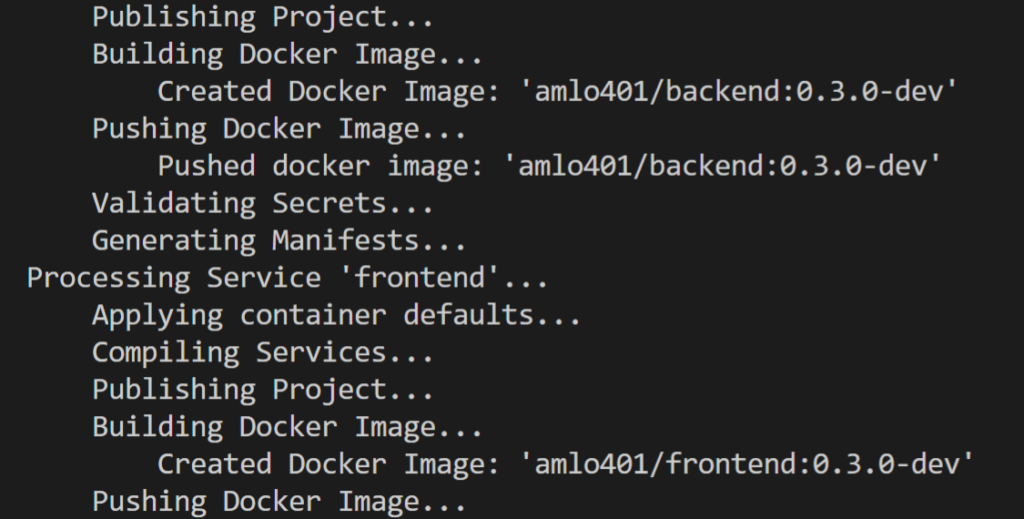
tye deploy does many different things to deploy an application to Kubernetes. It will:

  • Create a docker image for each project in your application.
  • Push each docker image to your container registry.
  • Generate a Kubernetes Deployment and Service for each project.
  • Apply the generated Deployment and Service to your current Kubernetes context.

Image tye deploy building images

You should now see three pods running after deploying.

kubectl get pods


NAME                                             READY   STATUS    RESTARTS   AGE
backend-ccfcd756f-xk2q9                          1/1     Running   0          85m
frontend-84bbdf4f7d-6r5zp                        1/1     Running   0          85m
redis-5f554bd8bd-rv26p                           1/1     Running   0          98m

You can visit the frontend application, you will need to port-forward to access the frontend from outside the cluster.

kubectl port-forward svc/frontend 5000:80

Now navigate to http://localhost:5000 to view the frontend application working on Kubernetes.

Image kubernetes portforward

Currently tye does not automatically enable TLS within the cluster, and so communication takes place over HTTP instead of HTTPS. This is typical way to deploy services in kubernetes – we may look to enable TLS as an option or by default in the future.

Adding a registry to tye.yaml

If you want to use tye deploy as part of a CI/CD system, it’s expected that you’ll have a tye.yaml file initialized. You will then need to add a container registry to tye.yaml. Based on what container registry you configured, add the following line in the tye.yaml file:

registry: <registry_name>

Now it’s possible to use tye deploy without --interactive since the registry is stored as part of configuration.

This step may not make much sense if you’re using tye.yaml to store a personal Dockerhub username. A more typical use case would storing the name of a private registry for use in a CI/CD system.

For a conceptual overview of how Tye behaves when using tye deploy for deployment, check out this document.

Undeploying your application

After deploying and playing around with the application, you may want to remove all resources associated from the Kubernetes cluster. You can remove resources by running:

tye undeploy

This will remove all deployed resources. If you’d like to see what resources would be deleted, you can run:

tye undeploy --what-if

Follow up

If you want to experiment more with using Tye, we have a variety of different sample applications and tutorials that you can walk through, check them out down below:

Tye Roadmap

We have been diligently working on adding new capabilities and integrations to continuously improve Tye. Here are some integrations below that we have recently released. There is also information provided on how to get started for each of these:

  • Ingressto expose pods/services created to the public internet.
  • Redisto store data, cache, or as a message broker.
  • Daprfor integrating a Dapr application with Tye.
  • Zipkinusing Zipkin for distributed tracing.
  • Elastic Stackusing Elastic Stack for logging.

While we are excited about the promise Tye holds, it’s an experimental project and not a committed product. During this experimental phase we expect to engage deeply with anyone trying out Tye to hear feedback and suggestions. The point of doing experiments in the open is to help us explore the space as much as we can and use what we learn to determine what we should be building and shipping in the future.

Project Tye is currently commited as an experiment until .NET 5 ships. At which point we will be evaluating what we have and all that we’ve learnt to decide what we should do in the future.

Our goal is to ship every month, and some new capabilities that we are looking into for Tye include:

  • More deployment targets
  • Sidecar support
  • Connected development
  • Database migrations

Conclusion

We are excited by the potential Tye has to make developing distributed applications easier and we need your feedback to make sure it reaches that potential. We’d really love for you to try it out and tell us what you think, there is a link to a survey on the Tye dashboard that you can fill out or you can create issues and talk to us on GitHub. Either way we’d love to hear what you think.

The post Introducing Project Tye appeared first on ASP.NET Blog.


F# 5 and F# tools update

We’re excited to announce some updates to F# 5 today! We shipped a lot of preview features since F# 5 preview 1, and they have all been stabilizing since that release. Today, we’re happy to announce some minor additions to F# 5 and talk about some pretty cool performance work we’ve been doing.

Here’s how you get the latest release:

If you’re using Visual Studio on Windows, you’ll need both the .NET 5 preview SDK and Visual Studio Preview installed.

Using F# 5 preview

You can use F# 5 preview via the .NET 5 preview SDK, or through the .NET and Jupyter Notebooks support.

If you’re using the .NET 5 preview SDK, check out a sample repository showing off some of what you can do with F# 5. You can play with each of the features there instead of starting from scratch.

If you’d rather use F# 5 in your own project, you’ll need to add a LangVersion property with preview as the value. It should look something like this:

Alternatively, if you’re using Jupyter Notebooks and want a more interactive experience, check out a sample notebook that shows the same features, but has a more interactive output.

F# 5 features and improvements

This release introduces only one new langauge feature. However, the other features we’ve shipped so far have been further stabilized. There are a few more features in the pipeline that we’re considering before we call F# 5 feature complete, and we’ll post updates when they’re available.

Default interface member interop

C# 8 introduced the ability to define interfaces with default implementations like this:

You can now consume these in F# through the standard means of implementing an interface:

This will let F# developers safely take advantage of packages or other components written in C# that use this feature and expect callers to support it.

We currently don’t support generating default implementations, though. If you’d like to do that, please search for or file a suggestion in the F# language suggestions repository.

Compiler performance improvements

We’ve been focused on improving the performance of the F# compiler and tools for some time now, and with each release we see incremental progress. Although performance can always be improved, we’re quite happy with our progress so far!

To demonstrate the difference, check out this fork of the FSharpPlus repository, a codebase that stresses the F# compiler significantly with its use of certain advanced features. You can modify the global.json file to specify a .NET SDK on your machine. In this case, it has a .NET 5 preview and a released .NET Core 3.1 SDK from Visual Studio 2019 update 16.5 specified. If you have those SDKs on your machine, you can test this out yourself.

On my personal desktop, I get the following timings when running the following commands:

dotnet clean FSharpPlus.sln
dotnet build FSharpPlus.sln -c Release

.NET Core 3.1: 3:01.510
.NET 5: 2:16.23

That’s quite an improvement! However, not all of the wall-clock time improvements are due to F#. Everything in the .NET toolchain improved too.

To dig into this a little more, I performed the same steps as before, but ran the following commands to generate an MSBuild performance summary.:

dotnet clean FSharpPlus.sln
dotnet msbuild FSharpPlus.sln /p:Congiguration=Release /clp:PerformanceSummary

With one run, I see the following differences in CPU time spent in the Fsc task (the F# compiler getting called):

.NET Core 3.1: 527_522 ms
.NET 5: 440_873 ms

(Note: because MSBuild is running things in parallel when it can, the CPU time is a lot longer than wall-clock time.)

This is a 16% improvement in time spent in the F# compiler to build the same codebase! When compiling the core project FSharpPlus.fsproj, I’ve personally seen up to a 35% improvement in compile times. The exact improvement can vary from machine to machine and build to build, especially if the build process doesn’t have the highest priority on your machine at the time. Regardless of these caveats, build times are always improved when building this project. This has held true for a few other OSS projects that were tested.

I uploaded both logs into a GitHub gist if you’re curious about the full breakdown.

Results like these are due to a lot of factors, one of which is improving the way that metadata is read and treated during compilation.

Additionally, our amazing OSS contributors have continually found small inefficiencies that they’ve diligently helped us improve over time. This is a continuing effort that we’re extremely grateful for.

Download the .NET 5 preview and try it out yourself!

Tooling improvements in Visual Studio 2019 Update 16.6

The compiler wasn’t the only thing that got faster in this release. We’ve been focusing on improving the performance and reliability of the Visual Studio tools for F# throughout the Visual Studio 2019 lifecycle, and this release is no different! Starting with Visual Studio 2019 Update 16.6, features like Find All References and Rename should run considerably faster and show results much sooner when scanning a large codebase.

To demonstrate this, I’ve uploaded two videos showing the Find All References operation on the string type in FAKE, a large F# OSS codebase. This is an extreme case that isn’t representative of "normal" usage for Find All References, but it helps demonstrate what might happen in the rare event that you do need to find references to an extremely common type in a large codebase.

The first video is with Visual Studio 2019 Update 16.5 (follow the link to YouTube for higher definition):

Note that results take a lot longer to start filling in, and the entire process takes about 1 minute and 11 seconds to complete. After Find All References was finished, Visual Studio was up to ~1.75GB of memory usage:

Image fake findrefs 16 5

The second is with the latest Visual Studio 2019 Update 16.6 (follow the link to YouTube for higher definition):

As you can see, results start showing up much faster, and the entire process took about 43 seconds to complete! After Find All References is finished running, Visual Studio was up to ~1.2GB of memory usage:

Image fake findrefs 16 6

Behind the scenes, two key components were rewritten:

  • The core component that is responsible for finding symbols in user code and yielding them back to a caller who asks for symbols that match a given input
  • The Visual Studio component that displays found symbols in the Find All References window and colorizes the text based on the source code being shown in the list

In addition to features like Find All References being faster, the amount of memory used to run it has also been significantly reduced, which is important when you’re working in a big codebase.

Just like with compiler performance, our amazing OSS contributors have continually found small inefficiencies in code that is called by tooling, which they’ve cleaned up and improved over time. We’re grateful for their contributions and look forward to many more opportunities to improve F# tooling with them.

The continuing F# 5 journey

We’ve got even more awesome stuff planned for F# 5, and we can’t wait to show you once they’re finished. Until that time, we’ll be focused on a few things:

  • Continuing inclusion of language features when their design and implementations are stable
  • Continuing to improve the tooling performance for larger F# codebases
  • Making F# in Jupyter and Visual Studio Code Notebooks the best language for data science and analytical work (more on this in future updates!)
  • Continuing to incorporate OSS contributions and strive to include them into releases as soon as possible

If you’d like to follow along on a much more detailed level, you can check out the F# development repository. We’re now tracking the work we’re focused on with a GitHub issue every 3 weeks, and we encourage you all to provide input to the list of things and let us know what you think.

Cheers, and happy F# coding!

The post F# 5 and F# tools update appeared first on .NET Blog.


source https://devblogs.microsoft.com/dotnet/f-5-update-for-net-5-preview-4/

ML.NET Model Builder is now a part of Visual Studio

ML.NET is a cross-platform, machine learning framework for .NET developers. Model Builder is the UI tooling in Visual Studio that uses Automated Machine Learning (AutoML) to train and consume custom ML.NET models in your .NET apps. You can use ML.NET and Model Builder to create custom machine learning models without having prior machine learning experience and without leaving the .NET ecosystem.

Model Builder in Visual Studio

Previously, Model Builder was a Visual Studio extension that had to be installed from the VS Marketplace. Now, Model Builder ships with Visual Studio 16.6 as a preview feature! After enabling the Model Builder feature in VS, all you have to do is right-click on your project in Solution Explorer and add Machine Learning.

Right Click and Add Machine Learning


New Model Builder Scenario screen

Model Builder’s Scenario screen got an update with a new, modern design and with updated scenario names to make it even easier to map your own business problems to the machine learning scenarios offered.

Additionally, anomaly detection, clustering, forecasting, and object detection have been added as example scenarios. These example scenarios are not yet supported by AutoML but are supported by ML.NET, so we’ve provided links to tutorials and sample code via the UI to help get you started.

Model Builder Scenario Screen


Azure training for image classification in Model Builder

For text-based classification, value prediction, image classification, and recommendation scenarios, Model Builder uses Automated Machine Learning (AutoML) locally to find and train the best model for your scenario and data. While local training is great for smaller datasets, you work within the constraints of your computer resources (CPU, memory, and disk).

For image classification, you can now take advantage of Azure training to scale up your resources to meet the demands of your scenario, especially for large datasets. You can set up a new Azure Machine Learning workspace and kick off an image classification training experiment right from Model Builder in Visual Studio.


[Azure ML Experiment Dialog in Model Builder

Read this blog post to learn more about how to train deep learning models in Azure with ML.NET Model Builder.

ML.NET Customer Showcase

Asgard Systems

Asgard Systems is a software and consulting company in Romania that uses ML.NET to forecast the demand of groceries. The company trains a separate ML.NET forecasting model for each product at the grocery store. All models are integrated into a .NET desktop application.

ML.NET has integrated well with Asgard’s existing solutions, leveraging SQL Server and Azure SQL, while also providing significant performance gains, both in training and inference, relative to Python implementations of the same models.


Image grocery store

“We have achieved greater than 24 million pounds of CO2 emissions in yearly savings already and by the end of 2020 /early 2021 we will have yearly savings of about 240 million pounds of CO2 emissions… We achieved impressive results without trying to influence the consumer to eat less meat or fruits or change their eating habits in any way.”
-Mihai Mihaiescu, System Architect at Asgard Systems

Read more about how Asgard Systems uses ML.NET in the ML.NET Customer Showcase.

Scancam

Scancam is a loss prevention company that uses ML.NET for object detection to prevent fuel theft in Australia. Fuel theft costs the Australian fuel retailing sector millions of dollars every year, so Scancam came up with a solution which uses ML.NET to detect cars and license plates at fuel station pumps and provides alerts for known offenders. These alerts are sent via SignalR to the end-user Xamarin application on iPad and TV displays inside the fuel station.

Scancam Xamarin App

“ML.NET allowed us to increase productivity by allowing us to code our ML components in the same language and tooling we use for everything else. ML.NET provided the easiest jumping point for our .NET developers to get started integrating machine learning to our applications.”
-June Tabadero, CTO at Scancam Industries

Read more about how Scancam uses ML.NET in the ML.NET Customer Showcase.

The Virtual ML.NET Community Conference

Join the community May 29-30 for a free online ML.NET conference.

The conference will have a full-day hands-on workshop, followed by another day of community-led sessions.

Sign up here to attend.

See you there!

Additional resources

Learn more about ML.NET and Model Builder from Microsoft Docs.

Not currently using Visual Studio? Try out the ML.NET CLI.

If you run into any issues, please let us know by creating an issue in our GitHub repo.

The post ML.NET Model Builder is now a part of Visual Studio appeared first on .NET Blog.


source https://devblogs.microsoft.com/dotnet/ml-net-model-builder-is-now-a-part-of-visual-studio/

ASP.NET Core updates in .NET 5 Preview 4

.NET 5 Preview 4 is now available and is ready for evaluation! .NET 5 will be a current release.

Get started

To get started with ASP.NET Core in .NET 5.0 Preview4 install the .NET 5.0 SDK.

If you’re on Windows using Visual Studio, we recommend installing the latest preview of Visual Studio 2019 16.6.

If you’re on macOS, we recommend installing the latest preview of Visual Studio 2019 for Mac 8.6.

Upgrade an existing project

To upgrade an existing ASP.NET Core 5.0 preview3 app to ASP.NET Core 5.0 preview4:

  • Update all Microsoft.AspNetCore.* package references to 5.0.0-preview.4.*.
  • Update all Microsoft.Extensions.* package references to 5.0.0-preview.4.*.

See the full list of breaking changes in ASP.NET Core 5.0.

That’s it! You should now be all set to use .NET 5 Preview 4.

What’s new?

Performance Improvements to HTTP/2

By adding support for HPack dynamic compression of HTTP/2 response headers in Kestrel, the 5.0.0-prevew4 release improves the performance of HTTP/2. For more information on how HPACK helps save bandwidth and help reduce latency, we recommend reading this excellent write-up by the team at CloudFlare.

Reduction in container image sizes

The canonical multi-stage Docker build for ASP.NET Core involves pulling both the SDK image and ASP.NET Core runtime image. By re-platting the SDK image upon the ASP.NET runtime image, we’re sharing layers between the two images. This dramatically reduces the size of the aggregate images that you pull. For more information about the size improvements and other container enhancements, check out the .NET 5 Preview 4 blog post

See the release notes for additional details and known issues.

Give feedback

We hope you enjoy this release of ASP.NET Core in .NET 5! We are eager to hear about your experiences with this latest .NET 5 release. Let us know what you think by filing issues on GitHub.

Thanks for trying out ASP.NET Core!

The post ASP.NET Core updates in .NET 5 Preview 4 appeared first on ASP.NET Blog.


.NET Core May 2020 Updates – 2.1.18 and 3.1.4

Today, we are releasing the .NET Core May 2020 Update. These updates contain security and reliability fixes. See the individual release notes for details on updated packages.

NOTE: If you are a Visual Studio user, there are MSBuild version requirements so use only the .NET Core SDK supported for each Visual Studio version. Information needed to make this choice will be seen on the download page. If you use other development environments, we recommend using the latest SDK release.

Getting the Update

The latest .NET Core updates are available on the .NET Core download page. This update will be included in a future update of Visual Studio.

See the .NET Core release notes ( 2.1.18 | 3.1.4 ) for details on the release, including issues fixed and affected packages.

Docker Images

.NET Docker images have been updated for today’s release. The following repos have been updated.

Note: You must pull updated .NET Core container images to get this update, with either docker pull or docker build --pull.

Lifecycle Updates

Ubuntu 20.04 has been added as a supported OS with this update of .NET Core.

.NET Core is now available natively in the Fedora 32 package archives. See the Fedora documentation for details.

Security

CVE-2020-1108: .NET Core Denial of Service Vulnerability

Microsoft is releasing this security advisory to provide information about a vulnerability in .NET Core. This advisory also provides guidance on what developers can do to update their applications to remove this vulnerability.

Microsoft is aware of a denial of service vulnerability which exists when .NET Core improperly handles web requests. An attacker who successfully exploited this vulnerability could cause a denial of service against a .NET Core web application. The vulnerability can be exploited remotely, without authentication.

A remote unauthenticated attacker could exploit this vulnerability by issuing specially crafted requests to the .NET Core application.

The update addresses the vulnerability by correcting how the .NET Core web application handles web requests.

CVE-2020-1161: ASP.NET Core Denial of Service Vulnerability

Microsoft is releasing this security advisory to provide information about a vulnerability in .NET Core. This advisory also provides guidance on what developers can do to update their applications to remove this vulnerability.

Microsoft is aware of a denial of service vulnerability which exists when ASP.NET Core improperly handles web requests. An attacker who successfully exploited this vulnerability could cause a denial of service against an ASP.NET Core web application. The vulnerability can be exploited remotely, without authentication.

A remote unauthenticated attacker could exploit this vulnerability by issuing specially crafted requests to the ASP.NET Core application.

The update addresses the vulnerability by correcting how the ASP.NET Core web application handles web requests.


The post .NET Core May 2020 Updates – 2.1.18 and 3.1.4 appeared first on .NET Blog.


source https://devblogs.microsoft.com/dotnet/net-core-may-2020/

Configuring Azure Services and emulators using Visual Studio

Starting with Visual Studio 16.6 Preview 2 the Connected Services tab offers a new experience called Service Dependencies. You can use it to connect your app to Azure services such as Azure SQL, Storage, Key Vault and many others. Wherever possible local emulation options are also available and more are planned for the future.

Connected Services tab - Service Dependencies table

Add a new Service Dependency

You can easily and quickly get the right NuGet packages, start-up code and configuration added to your project for every supported Azure service. You simply click add, pick the service from the list and follow the 2-3 steps in the wizard. Here is an example of adding Azure Cosmos DB

Connected Services tab - Add Azure CosmosDB

Provision a new instance of an Azure service without leaving the IDE

In the above example we re-used an existing instance of Azure Cosmos DB, but you can also create new instances of all the supported Azure services without leaving the IDE. Here is Azure Cosmos DB again as an example of provisioning Azure resources from within Visual Studio

Connected Services tab - Create Azure Cosmos DB Instance

Configure service dependencies for remote environments

Using Visual Studio to publish your app to Azure App Service gives you the opportunity to configure these dependencies for the remote environment you are publishing to. Right click > Publish on your project in Solution Explorer and go through the wizard to create a new publish profile for Azure App Service. At the end you will see a Service Dependencies list already containing all of your application’s dependencies ready to be configured for this remote environment

Publish - Unconfigured Service Dependencies

How it works under the covers

To support all of this Visual Studio creates two new files visible in Solution Explorer under Properties called serviceDependencies.json and serviceDependencies.local.json. Both of these files are safe to check in as they do not contain any secrets.

serviceDependencies.json file

Visual Studio also creates a file called serviceDependencies.local.json.user which is not visible in Solution Explorer by default. This file contains information that could be considered a secret (e.g. resource IDs in Azure) and we do not recommend you check it in.

Service References

While working on the Connected Services tab we took the opportunity to consolidate our UX and make it the new home for the existing OpenAPI & gRPC Service References table. With everything being in one place now we have routed the Right Click > Add > Service Reference… context menu item in Solution Explorer to the consolidated Connected Services tab.

Connected Services Tab - Service References

Feedback

Please give all of the above a try and let us know what you think. Do you wish we supported a feature or Azure service that we don’t already? Please let us know! You can submit a new feature suggestion, leave us comments on this post and report any issues you may encounter using the built-in tools.

The post Configuring Azure Services and emulators using Visual Studio appeared first on ASP.NET Blog.


Share this post

Search This Blog

What's New

The "AI is going to replace devs" hype is over – 22-year dev veteran Jason Lengstorf [Podcast #201]

Image
Curriculum for the course The "AI is going to replace devs" hype is over – 22-year dev veteran Jason Lengstorf [Podcast #201] Today Quincy Larson interviews Jason Lengstorf. He's a college dropout who taught himself programming while building websites for his emo band. 22 years later he's worked as a developer at IBM, Netlify, run his own dev consultancy, and he now runs CodeTV making reality TV shows for developers. We talk about: - How many CEOs over-estimated the impact of AI coding tools and laid off too many devs, whom they're now trying to rehire - Why the developer job market has already rebounded a bit, but will never be the same - Tips for how to land roles in the post-LLM résumé spam job search era - How devs are working to rebuild the fabric of the community through in-person community events Support for this podcast is provided by a grant from AlgoMonster. AlgoMonster is a platform that teaches data structure and algorithm patterns in a structure...

Labels

Programming Video Tutorials Coursera Video Tutorials Plurasight Programming Tutorials Udemy Tutorial C# Microsoft .Net Dot Net Udemy Tutorial, Plurasight Programming Tutorials, Coursera Video Tutorials, Programming Video Tutorials Asp.Net Core Asp.Net Programming AWS Azure GCP How To WordPress Migration C sharp AWS Project Git Commands FREE AWS Tutorial OldNewThings Git Tutorial Azure vs AWS vs GCP New in .Net javascript AI Google I/O 2025 Wordpress jquery Generative Video Git Git Squash Google Flow AI PHP SQL Veo 3 squash commit CSS Cloud Services React Tutorial With Live Project Source Code git rebase CPR Nummer Dropdown Reset Javascript Figma Figma Beginner Tutorial Geolocation Non-Programmer Content Python Free Course Think Simply Awesome Tutorial UI UX Live Project UI/UX Full Course Wireframing dotnet core runtime error html API Gateway AWS EKS vs Azure AKS All in one WP stuck C++ C++ Coroutines CPR Denmark ChatGPT Cloud Database Cloud DevOps Cloud Security Cloud Storage Contact Form 7 Dropdown Unselect Javascript E commerce Free AWS Terraform Project Training Git Commit Google Drive Files Google Drive Tips Http Error 500.30 Http Error 500.31 Interview Questions Learn Courutines C++ Microservices for Live Streaming PII Denmark Pub Sub SQL Server SSIS Terraform Course Free Terraform Tutorial Free USA E commerce strategies UpdraftPlus UpdraftPlus Manual Restore Website Optimization Strategies dropdown javascript select drop down javascript smarttube apk error 403 smarttube next 403 Error 413 Error 503 504 524 AI & ML AI Assistants AI Course CS50 AI in daily life AWS API Gateway AWS EBS AWS EC2 vs Azure VMs vs GCP Compute Engine AWS EFS AWS IAM AWS Lamda AWS RDS vs Azure SQL AWS Redshift AWS S3 AZ-104 AZ-104 Free Course AZ-104 Full Course AZ-104 Pass the exam Abstract Class C# Abstract Method Ajax Calender Control Ajax Control Toolkit All In One Extension Compatibility All In One WP Freeze All In One WP Migration All in one WP All-in-One WP Migration Android 15 Android TV Applying Theme html Asp.net core runtime Error Audio Auto Complete Azure AD Azure APIM Azure Administrator Certification Azure Blob Storage Azure Data Lake Azure Files Azure Function Azure Managed Disk Azure Synapse Base Class Child Class Best Grocery Price Big Data BigBasket vs Grofers Bing Homepage Quiz Blogger Import Blogger Post Import Blogger XML Import Bluetooth Connectivity Browser Detail Building Real-Time Web Applications Bulk Insert CI/CD CPR Address Update CPR Generator CPR Generator Denmark CS50 AI Course CS50 AI Python Course CS50 Artificial Intelligence Full Course CVR Centrale Virksomhedsregister Change Workspace TFS ChatGPT Essay Guide ChatGPT Usage ChatGPT vs Humans Cloud API Management Cloud CDN Cloud Computing Cloud Data Warehouse Cloud Event Streaming Cloud IAM Cloud Messaging Queue Cloud Monitoring and Logging Cloud Networking CloudFront Cloudflare Cloudwatch Compute Services Connect a Bluetooth Device to my PC site:microsoft.com Containers ControlService FAILED 1062 Corona Lockdown MP CosmosDB Covid19 Covid19 Bhopal Covid19 Home Delivery MP Covid19 Indore Covid19 Susner Covid19 Ujjain Cypress Javascript Cypress Javascript framework Cypress Javascript testing Cypress Javascript tutorial Cypress Javascript vs typescript DNS Danish CVR Data Analytics Data Analytics Course Free Data Engineering Data Structure Full Course Data Visualization Database Database Diagram Visualizer Davek Na Dodano Vrednost Dbdiagram export seeder Deep Learning Course Denmark Numbers Det Centrale Personregister Det Centrale Virksomhedsregister DevOps Device Compatibility Dictionary Dictionary in C# Digital Economy Disaster Recovery for Web Applications Disaster-Proof Infrastructure Dmart Frenchise Dmart Home Delibery Dmart Mumbai Address Dmart Pickup Points Doodle Jump Drive Images On Blog Drive Images On Website Driver Problems DropDown Dropbox Dropdown jquery DynamoDB ETL ETL Package Ecommerce Store using AWS & React Embed Drive Images Escape Sequences in c#.Net Event Hub Explicit Join Extract Facebook App Fake CVR Denmark Fake DDV Slovenia Fake VAT Number Fake Virk Number Faker Feature Toggle Find CPR Information Find a Word on Website Firestore Flappy Bird Game Form Selectors using jQuery Free React Portfolio Template FreeCodeCamp Frontend Best Practices for Millions of Users Full Text Index View G Drive Hosting GAN certification course GCP Cloud Data Lake GCP Filestore GCP Functions GCP IAM GCP Persistent Disk Gemini Git Checkout Google Adsense Setting Google Beam Google BigQuery Google Conversion Tracking Google Docs Advanced Tutorial Google Drive Clone Google Drive Clone Bot Google Drive Clone HTML CSS Google Drive Clone PHP Google Drive Clone React Google Drive Clone Tutorial Google Drive Clone VueJS Google Drive File Sharing Google Drive Images Google Drive Sharing Permissions Grocery Price Compare Online Grocery in Corona Grocery in Covid19 Grofers vs DMart vs Big basket HAXM installation HTML Storage HTML to PDF Javascript HTML2Canvas HTML5 HTML5 Append Data HTML5 Audio HTML5 Data Storage HTML5 Storage HTML5 Video Harvard University AI Course Header Sent Height Jquery High Availability in Live Streaming Platforms High-Concurrency Frontend Design High-Concurrency Web Applications How to Search for a Word on Mac Html2Canvas Black Background issue Http Error 413 Http Error 500.35 IIS INNER Join Image Gallery Blogger Image Gallery Blogger Picasa Image Gallery Blogger Template Image Gallery Blogger Template Free Implicit Join Indexing in SQL Instagram Clone React Instagram Clone Script Install NodeJS Ubuntu Internet Infrastructure Interview IoT IoT Core IoT Hub JS Game Tutorial Java Feature Toggle Javascript game tutorial JioCinema Case Study Keep Me Login Key Management Kinesis Learn Scrappy with a live project List Live Streaming Data Delivery Live Streaming Performance Optimization Load Load Balancer Looping Dictionary MTech First Semester Syllabus MTech Syllabus MVC Mac Mac Finder Shortcut Media Controller Media Group Attribute Microservices Architecture for Scalability Missing MySQL Extension Mobile Optimization Multiple Audio Sync Multiple Video Sync Mumbai Dmart List MySQL MySQL ERD Generator Next.js Beginner Tutorial Ngnix NodeJS NodeJS Ubuntu Commands Numpy OOPS Concepts OOPS in C# Object Oriented Programming Object Storage Outer Join PHP Installation Error PHP WordPress Installation Error Pandas Personligt identifikations nummer Pipedrive Pipedrive Quickbooks Integration Portfolio Website using React Project Astra PyTorch Quickbooks Quote Generator RGPV Syllabus Download Random SSN Generator ReCaptcha Dumbass React Feature Toggle Real-Time Video Processing Architecture Real-Time Video Processing Backend RegExp Regular Expression Reinstall Bluetooth Drivers Remember Me Remove NodeJS Ubuntu Renew DHCP Lease Reset IP Address Linux Reset IP Address Mac Reset IP Address Windows Reset Remote Connection Reset Remote Connection Failure Resize Textarea Restore Errors Restore Failed UpdraftPlus Route 53 SOS Phone SQL Indexed Tables SQL Joins SQL Seed generator SQS SSIS Package SSIS Tutorial SSN Generator for Paypal SSN Number SSN Number Generator SSN Validator Safari 8 Safari Video Delay SageMaker Scalable Backend for High Concurrency Scalable Cloud Infrastructure for Live Streaming Scalable Frontend Architectures Scalable Live Streaming Architecture Scrapy course for beginners Search A word Search for a Word in Google Docs Secret Management Serverless Service Bus Slovenian VAT Generator SmartTube Software Architect Interview Questions Software Architect Mock Interview Sparse Checkout Spotlight Mac Shortcut Stored Procedure Subtree Merge T-Mobile IMEI Check TFS TMobile IMEI check unlock Team Foundation Server Terraform Associate Certification Training Free Text Search Text color Textarea Resize Jquery Theme Top WordPress Plugins Transform Trim javascript Troubleshooting TypeScript Beginner Tutorial Ubuntu Unleash Feature Toggle Update Computer Name UpdraftPlus 500 UpdraftPlus Backup Restore UpdraftPlus Error 500 UpdraftPlus Error 504 UpdraftPlus Error 524 UpdraftPlus HTTP Error UpdraftPlus New Domain UpdraftPlus Restore Not Working UpdraftPlus Troubleshooting Upstream Reset Error Use Google Drive Images VAT Number Generator Verizon imei check Verizon imei check paid off Verizon imei check unlock Verizon imei check\ Version Control Vertex AI Video View Indexing SQL Views in SQL Virksomhedsregister Virtual friends Visual Studio 2013 WHERE Clause WHPX expo Web Security Web scraping full course with project Web3 What is Feature Toggle WordPress Backup Troubleshooting WordPress Backup UpdraftPlus WordPress Database Backup WordPress Error 503 WordPress Installation Error WordPress Migration UpdraftPlus Wordpress Restore Workspaces Commands Your ip has been banned Zero Click angle between two points bing homepage quiz answers bing homepage quiz answers today bing homepage quiz not working bing homepage quiz reddit bing homepage quiz today byod Verizon imei check chatgpt essay example chatgpt essay writer chatgpt essay writing check tmobile imei contact form 7 captcha contact form 7 captcha plugin contact form 7 recaptcha v3 cpr-nummer engelsk cpr-nummer liste cpr-nummer register cpr-nummer tjek dbdiagram dom load in javascript dotnet core hosting bundle dotnet failed to load dotnet runtime error get url in php how to search for a word on a page how to search for a word on a page windows ipconfig release is cypress javascript istio transport failure jQuery AutoComplete jQuery Input Selector jQuery Menu jQuery Options joins in mySql jquery selector jquery selectors jsPDF jsPDF images missing key key-value keypress event in jQuery kubernetes upstream error localStorage metro by t-mobile imei check nemid cpr-nummer react native expo setup react native on Windows react native setup recaptcha v3 contact form 7 recaptcha wordpress contact form 7 reset connection failure resize control jQuery response code 403 smarttube round number in javascript select sessionStorage smarttube 403 エラー smarttube apk smarttube beta smarttube download smarttube reddit smarttube unknown source error 403 smartube sos iphone top right sos on iphone 13 sos only iphone substr substr in javascript tmobile imei tmobile imei check paid off tmobile imei number total by Verizon imei check trim trim jquery turn off sos iphone turn off sos on iphone 11 unknown source error 403 unknown source error response code 403 smarttube upstream connect error url in php view hidden files mac finder zuegQmMdy8M ошибка 403 smarttube
  • ()
  • ()
Show more
an "open and free" initiative. Powered by Blogger.