Lanyon A Simple Blogger template

Free tutorials, courses, generative tools, and projects built with Javascript, PHP, Python, ML, AI,.Net, C#, Microsoft, Youtube, Github Code Download and more.

April 2021

Archive for April 2021

Learn Docker - DevOps with Node.js & Express


Curriculum for the course Learn Docker - DevOps with Node.js & Express

Learn the core fundamentals of Docker by building a Node/Express app with a Mongo & Redis database. We'll start off by keeping things simple with a single container, and gradually add more complexity to our app by integrating a Mongo container, and then finally adding in a redis database for authentication. We'll learn how to do things manually with the cli, then move on to docker compose. We'll focus on the challenges of moving from a development environment to a production environment. We'll deploy and Ubuntu VM as our production server, and utilize a container orchestrator like docker swarm to handle rolling updates. ✏️ Course developed by Sanjeev Thiyagarajan. Check out his channel: https://www.youtube.com/channel/UC2sYgV-NV6S5_-pqLGChoNQ ⭐️ Course Contents ⭐️ 0:00:14 Intro & demo express app 0:04:18 Custom Images with Dockerfile 0:10:34 Docker image layers & caching 0:20:26 Docker networking opening ports 0:26:36 Dockerignore file 0:31:46 Syncing source code with bind mounts 0:45:30 Anonymous Volumes hack 0:51:58 Read-Only Bind Mounts 0:54:58 Environment variables 0:59:16 loading environment variables from file 1:01:31 Deleting stale volumes 1:04:01 Docker Compose 1:21:36 Development vs Production configs Part 02: Working with multiple containers 1:44:47 Adding a Mongo Container 2:01:48 Communicating between containers 2:12:00 Express Config file 2:21:45 Container bootup order 2:32:26 Building a CRUD application 2:51:27 Sign up and Login 3:06:57 Authentication with sessions & Redis 3:34:36 Architecture Review 3:40:48 Nginx for Load balancing to multiple node containers 3:54:33 Express CORS Part 03: Moving to Prod 3:57:44 Installing docker on Ubuntu(Digital Ocean) 4:03:21 Setup Git 4:05:37 Environment Variables on Ubuntu 4:14:12 Deploying app to production server 4:18:57 Pushing changes the hard way 4:25:58 Rebuilding Containers 4:27:32 Dev to Prod workflow review 4:30:50 Improved Dockerhub workflow 4:46:10 Automating with watchtower 4:56:06 Why we need an orchestrator 5:03:32 Docker Swarm 5:16:13 Pushing changes to Swarm stack -- Learn to code for free and get a developer job: https://www.freecodecamp.org Read hundreds of articles on programming: https://freecodecamp.org/news And subscribe for new videos on technology every day: https://youtube.com/subscription_center?add_user=freecodecamp

Watch Online Full Course: Learn Docker - DevOps with Node.js & Express


Click Here to watch on Youtube: Learn Docker - DevOps with Node.js & Express


This video is first published on youtube via freecodecamp. If Video does not appear here, you can watch this on Youtube always.


Udemy Learn Docker - DevOps with Node.js & Express courses free download, Plurasight Learn Docker - DevOps with Node.js & Express courses free download, Linda Learn Docker - DevOps with Node.js & Express courses free download, Coursera Learn Docker - DevOps with Node.js & Express course download free, Brad Hussey udemy course free, free programming full course download, full course with project files, Download full project free, College major project download, CS major project idea, EC major project idea, clone projects download free

MERN Stack Course - ALSO: Convert Backend to Serverless with MongoDB Realm


Curriculum for the course MERN Stack Course - ALSO: Convert Backend to Serverless with MongoDB Realm

Learn how to create a full-stack web app using the MERN stack. The MERN stack is MongoDB, Express, React, and Node.js. Also, learn how to use MongoDB Realm to convert the backend to serverless and host the entire thing for free in the cloud. You will even learn how to host the React frontend for free. ✏️ Course developed by Beau Carnes. 💻 Code: https://github.com/beaucarnes/restaurant-reviews In the code, the "realm" directory has the code to use in the MongoDB Realm functions. 🔗 Learn more about MongoDB here: https://university.mongodb.com/?utm_campaign=new_students&utm_source=partner&utm_medium=referral ⭐️ Resources ⭐️ 🔗 MongoDB Basics Course: https://university.mongodb.com/courses/M001/about?utm_campaign=new_students&utm_source=partner&utm_medium=referral 🔗 MongoDB for JavaScript Developers Course: https://university.mongodb.com/courses/M220JS/about?utm_campaign=new_students&utm_source=partner&utm_medium=referral 🔗 Docs on query operators (MQL & Aggregation Framework): https://docs.mongodb.com/manual/reference/operator/ 🔗 MongoDB security best practices: https://www.mongodb.com/security-best-practices ⭐️ Course Contents ⭐️ ⌨️ (0:00:00)​ Introduction ⌨️ (0:02:40) MongoDB overview ⌨️ (0:03:48) Setup MongoDB Atlas Cloud Database ⌨️ (0:06:44) Load sample data into database ⌨️ (0:08:16) Create Node / Express backend ⌨️ (1:05:38) Create React frontend ⌨️ (2:02:58) Setup MongoDB Realm and replace backend ⌨️ (2:39:46) Host frontend on MongoDB Realm 🎉 MongoDB provided a grant that made this course possible. -- Learn to code for free and get a developer job: https://www.freecodecamp.org Read hundreds of articles on programming: https://freecodecamp.org/news And subscribe for new videos on technology every day: https://youtube.com/subscription_center?add_user=freecodecamp

Watch Online Full Course: MERN Stack Course - ALSO: Convert Backend to Serverless with MongoDB Realm


Click Here to watch on Youtube: MERN Stack Course - ALSO: Convert Backend to Serverless with MongoDB Realm


This video is first published on youtube via freecodecamp. If Video does not appear here, you can watch this on Youtube always.


Udemy MERN Stack Course - ALSO: Convert Backend to Serverless with MongoDB Realm courses free download, Plurasight MERN Stack Course - ALSO: Convert Backend to Serverless with MongoDB Realm courses free download, Linda MERN Stack Course - ALSO: Convert Backend to Serverless with MongoDB Realm courses free download, Coursera MERN Stack Course - ALSO: Convert Backend to Serverless with MongoDB Realm course download free, Brad Hussey udemy course free, free programming full course download, full course with project files, Download full project free, College major project download, CS major project idea, EC major project idea, clone projects download free

OpenGL Course - Create 3D and 2D Graphics with C++


Curriculum for the course OpenGL Course - Create 3D and 2D Graphics with C++

Learn how to use OpenGL to create 2D and 3D vector graphics in this course. Course by Victor Gordan. Check out his channel: https://www.youtube.com/channel/UC8WizezjQVClpWfdKMwtcmw 💻 Code: https://github.com/VictorGordan/opengl-tutorials See top comment for more resources. ⭐️ Contents ⭐️ Introduction 0:00:00 Introduction to Course Install 0:00:00 Downloads 0:02:11 Setting Up VS Project 0:02:50 Generating GLFW 0:03:29 Build Solution GLFW 0:04:03 Importing Libraries 0:04:53 Configuring VS 0:06:02 Finishing up & Testing Window 0:06:36 Initializing GLFW 0:07:03 Configuring GLFW 0:08:26 Creating Window 0:09:53 While Loop 0:11:01 OpenGL Viewport 0:11:36 Buffer Explanation 0:12:55 Adding Color 0:14:03 Comments for Window Triangle 0:14:25 Graphics Pipeline 0:16:56 Shaders Source Code 0:17:24 Vertices 0:18:54 Vertex and Fragment Shaders 0:20:45 Shader Program 0:21:36 Vertex Buffer Object 0:24:35 Vertex Array Object 0:26:57 Cleaning Up 0:27:34 Rendering Loop 0:28:38 Comments for Triangle Index Buffer 0:29:24 Normal Triangle 0:29:47 Duplicate Vertices 0:30:06 Solution 0:30:26 Index Buffer 0:30:51 Implementation 0:32:22 Comments for Index Buffer Organizing 0:32:33 Introduction to Organizing 0:32:43 Shader Text Files 0:33:21 Shader Class 0:35:27 VBO Class 0:36:18 EBO Class 0:36:35 VAO Class 0:37:36 Adding Classes to Main.cpp 0:37:59 Comments for Organizing Shaders 0:38:34 Introduction to Shaders 0:38:44 Shaders Properties 0:38:57 Vertex Shader 0:40:01 Fragment Shader 0:40:17 Adding Colors 0:41:23 Modifying the VAO class 0:41:54 Vertex Attribute Pointer Explanation 0:43:09 linkAttrib Code 0:43:19 Interpolation 0:43:50 Uniforms 0:46:08 Error Checking Shaders 0:46:29 Comments for Shaders Textures 0:46:39 Types of Textures 0:46:54 stb Library 0:47:58 Square 0:48:14 Texture Sizes 0:48:37 Importing in an Image 0:49:19 Creating the Texture 0:49:43 Texture Units 0:50:19 Interpolation Types 0:51:11 Texture Mapping 0:52:27 Assigning the Image to the Texture 0:53:10 Errors 0:53:21 Mipmaps 0:53:50 Texture Coordinates 0:54:15 Vertex and Fragment Shaders 0:54:51 Finishing up 0:55:39 Texture Class 0:55:56 Comments for Textures Going 3D 0:56:01 Introduction to Going 3D 0:56:11 Correction 0:56:23 Matrices 0:56:57 GLM 0:57:26 Coordinate Types 0:58:35 Transformation Matrices 0:59:13 Matrix Initialization 0:59:41 View & Projection Matrices 1:01:16 Importing Matrices 1:01:53 Matrices Final Multiplication 1:02:07 Pyramid 1:02:41 Rotation & Timer 1:03:11 Depth Buffer 1:03:36 Comments for Going 3D Camera 1:04:11 Header File 1:05:04 Basic Camera Class Functions 1:05:54 Main File Changes 1:06:21 Vertex Shader Changes 1:06:43 Key Inputs 1:07:38 Mouse Inputs 1:09:21 Fixing Camera Jumps 1:09:49 Comments for Camera Lighting 1:10:13 Modify Camera 1:10:30 Light Cube 1:10:50 Light Color 1:12:03 Diffuse Lighting & Normals 1:15:36 Ambient Lighting 1:16:18 Specular Lighting 1:17:54 Comments for Lighting Specular Maps 1:18:15 Modify Texture Class 1:18:34 Plane With Texture 1:19:06 Specular Maps Theory 1:19:30 Implementing Specular Maps 1:20:06 Ending for Specular Maps Types of Light 1:20:16 Types of Light 1:20:26 Point Light 1:20:41 Intensity Attenuation 1:20:51 Inverse Square Law 1:21:03 CG Intensity Equation 1:21:36 Implementation of Attenuation 1:22:09 Directional Light 1:22:52 Spotlight 1:23:08 Light Cones 1:23:18 Cones Comparison 1:23:31 Cos vs Angle 1:23:45 Finishing the Spotlight 1:24:19 Comments for Types of Light Mesh Class 1:24:33 Introduction for Mesh Class 1:24:46 Mesh Definition 1:25:01 Mesh Class Header 1:25:58 Modify the VBO Class 1:27:06 Modify the EBO Class 1:27:16 Mesh Constructor 1:27:41 Rearrange Shader Layouts 1:28:10 Mesh Draw Function I 1:28:51 Modify the Texture Class 1:29:22 Mesh Draw Function II 1:29:54 Modify the Uniforms 1:30:20 Main.cpp Changes 1:31:06 Comments for Mesh Class Model Loading 1:31:28 Introduction for Model Loading 1:31:47 Small Note on 3D Models 1:32:27 JSON Library 1:32:41 Model Header 1:33:03 Model.cpp File 1:33:13 JSON File Structure 1:33:30 Getting the Binary Data 1:34:07 glTF File Structure 1:36:28 getFloats() and getIndices() 1:39:09 Grouping Functions 1:39:19 assembleVertices() 1:39:50 Modifying the Texture Class 1:40:22 getTextures() 1:41:50 loadMesh() 1:42:23 Matrix Transformations Explanation 1:42:54 traverseNode() Declaration 1:43:28 Modifying the Mesh Class 1:43:41 Modifying the Vertex Shader 1:44:15 traverseNode() Writing 1:45:18 Modifying the Main.cpp File 1:45:28 Examples of Models 1:46:01 Comments for Model Loading

Watch Online Full Course: OpenGL Course - Create 3D and 2D Graphics with C++


Click Here to watch on Youtube: OpenGL Course - Create 3D and 2D Graphics with C++


This video is first published on youtube via freecodecamp. If Video does not appear here, you can watch this on Youtube always.


Udemy OpenGL Course - Create 3D and 2D Graphics with C++ courses free download, Plurasight OpenGL Course - Create 3D and 2D Graphics with C++ courses free download, Linda OpenGL Course - Create 3D and 2D Graphics with C++ courses free download, Coursera OpenGL Course - Create 3D and 2D Graphics with C++ course download free, Brad Hussey udemy course free, free programming full course download, full course with project files, Download full project free, College major project download, CS major project idea, EC major project idea, clone projects download free

.NET Framework 4.5.2, 4.6, 4.6.1 will reach End of Support on April 26, 2022

.NET Framework 4.5.2, 4.6, and 4.6.1 will reach end of support* on April 26, 2022. After this date, we will no longer provide updates including security fixes or technical support for these versions.

Customers currently using .NET Framework 4.5.2, 4.6, or 4.6.1 need to update their deployed runtime to a more recent version – at least .NET Framework 4.6.2 before April 26, 2022 – in order to continue to receive updates and technical support.

*Windows 10 Enterprise LTSC 2015 shipped with .NET Framework 4.6 built into the OS. This OS version is a long-term servicing channel (LTSC) release. We will continue to support .NET Framework 4.6 on Windows 10 Enterprise LTSC 2015 through end of support of the OS version (October 2025).

There is no change to the support timelines for any other .NET Framework version, including .NET Framework 3.5 SP1, which will continue to be supported as documented on our .NET Framework Lifecycle FAQ.

Why are we doing this?

The .NET Framework was previously digitally signed using certificates that use the Secure Hash Algorithm 1 (SHA-1). SHA-1 is a legacy cryptographic hashing algorithm that is no longer deemed secure. We are retiring content that were signed using digital certificates that used SHA-1 to support evolving industry standards.

After looking at download and usage data across the different versions of .NET Framework, we found that updating .NET Framework 4.6.2 and newer versions to support newer digital certificates (for the installers) would satisfy the vast majority (98%) of users without them needing to make a change. The small set of users using .NET Framework 4.5.2, 4.6, or 4.6.1 will need to upgrade to a later .NET Framework version to stay supported. Applications do not need to be recompiled. Given the nature of this change, we decided that targeting .NET Framework 4.6.2 and later was the best balance of support and effort.

See this support article on retiring SHA-1 content for more information.

When .NET Framework 4.5.2, 4.6, and 4.6.1 reach end of support, applications that run on top of these versions will continue to run. Starting May 2022, we won’t be issuing security updates for .NET Framework 4.5.2, 4.6, and 4.6.1 when we issue these security updates for .NET Framework 4.6.2 and later versions. This means that starting May 2022, if a computer has .NET Framework 4.5.2, 4.6, or 4.6.1 installed, it may be unsecure. Additionally, if you run into any issue and need technical support, you will be asked to first upgrade to a supported version.

.NET Framework 4.6.2 shipped nearly 5 years ago, and .NET Framework 4.8 shipped 2 years ago, so both versions are solid, stable runtimes for your applications. .NET Framework 4.6.2 and 4.8 are highly compatible in-place updates (replacements) for .NET 4.5.2, 4.6, and 4.6.1 and broadly deployed to hundreds of millions of computers via Windows Update (WU). If your computer is configured to take the latest updates from WU your application is likely already running on .NET Framework 4.8.

If you have not deployed .NET Framework 4.6.2 or a later version yet, you only need to update the runtime on which the application is running to a minimum version of 4.6.2 to stay supported. If your application was built to target .NET Framework 4 – 4.6.1, it should continue to run on .NET Framework 4.6.2 and later without any changes in most cases. There is no need for you to retarget or recompile against .NET Framework 4.6.2. That said, we strongly recommend you validate that the functionality of your app is unaffected when running on the newer runtime version before you deploy the updated runtime in your production environment.

Resources

Here are some other resources you may find helpful:

We are committed to help you ensure your apps work on the latest versions of our software. Should you have any questions that remain unanswered, we’re here to help. You should engage with Microsoft Support through your regular channels for a resolution.

Additionally, if you run into compatibility or app issues as you transition to .NET Framework 4.6.2 or later, there’s App Assure. We’ll help you resolve compatibility issues at no additional cost. You can contact App Assure for remediation support or by email if you experience any challenges submitting your request (ACHELP@microsoft.com).

You may also want to look at this FAQ for more detailed answers or questions not covered in this post.

Closing

.NET Framework 4.5.2, 4.6, and 4.6.1 will be reaching end of support on April 26, 2022 and after this date we will no longer provide updates including security fixes or technical support for these versions. We strongly recommend you migrate your applications to at least .NET Framework 4.6.2 or higher before this date.

The post .NET Framework 4.5.2, 4.6, 4.6.1 will reach End of Support on April 26, 2022 appeared first on .NET Blog.


source https://devblogs.microsoft.com/dotnet/net-framework-4-5-2-4-6-4-6-1-will-reach-end-of-support-on-april-26-2022/

Conversation about crossgen2

Crossgen2 is an exciting new platform addition and part of the .NET 6 release. It is a new tool that enables both generating and optimizing code in a new way.

The crossgen2 project is a significant effort, and is the focus of multiple engineers. I thought it might be interesting to try a more conversational approach to exploring new features. I sent a set of questions to the team. Simon Nattress offered to tell us more about crossgen2. Let’s see what he said. I’ll provide my own thoughts, too.

What is crossgen for and when should it be used?

Simon: Crossgen is a tool that provides ahead-of-time (AOT) compilation for your code so that the need for JITing at runtime is reduced. When publishing your application, Crossgen runs the JIT over all assemblies and stores the JITted code in an extra section that can be quickly fetched at runtime. Crossgen should be used in scenarios where fast startup is important.

Rich: You might see crossgen and readytorun terms used interchangeably. Crossgen is a tool that generates native code in (at least today) the readytorun format. The readytorun format is primarily oriented on being compatible across assemblies, and having the same compatibility guarantee as IL, while offering the performance benefits of ahead-of-time compiled code. Starting with crossgen2, it has some other modes with other characteristics.

Why are we making a new version of crossgen? What are our goals?

Simon: Crossgen’s pedigree comes from the early .NET Framework days. Its implementation is tightly coupled with the runtime (it essentially is just the runtime and JIT attached to a PE file emitter). We are building a new version of Crossgen – Crossgen 2 – which starts with a new code base architected to be a compiler that can perform analysis and optimizations not possible with the previous version.

Rich: As the .NET Core project became more mature and we saw usage grow across multiple application scenarios, we realized that crossgen’s limitation of only really being able to produce native code of one flavor with one set of characteristics was going to be a big problem. For example, we might want to generate code with different characteristics for Windows desktop on one hand and Linux containers on the other. The need for that level of code generation diversity is what motivated the project.

Is crossgen -> crossgen2 similar to the native code csc -> managed Roslyn transition? How long has it been worked on?

Simon: The Roslyn transition to managed was not just a rewrite in a different language. It defined an analysis platform for using CSC as an API. It can be used as a compiler and as a source code analyzer in an editor. Similarly, Crossgen2 is not simply a rewrite in managed. The architecture uses a graph to drive analysis and compilation. This allows scanners, optimizers, analyzers to all work off a common representation of the assembly being compiled. The project has been worked on for 2 years – the origins of the Crossgen2 compiler began as a research project around 2016.

Rich: We have a lot of people on the team that primarily write C/C++ (even assembly), but most people like writing C# better and are more productive. Every release, more of the product gets moved to C# for this and other reasons.

What are the key benefits and also the drawbacks from writing crossgen in C#?

Simon: Writing in C# gives us access to a rich set of .NET APIs as well as memory safety guarantees provided by using a managed language. A drawback of using C# is increased processing time when using Crossgen2 on many small assemblies at once because of the overhead of starting the runtime many times. Fortunately, we can mitigate much of that by running Crossgen2 on itself!

Rich: It is also super helpful being on the same team as the folks adding new capabilities to C# and .NET libraries. There is a lot of shared thinking and collaboration on low-level scenarios to enable C# to be a high-performance language. The more challenges we run into to make low-level code fast, the more we add features to fix that. It’s a virtuous cycle.

Can you describe some of the projects that are planned that are made possible with crossgen2?

Simon: Crossgen2 (unlike native Crossgen) allows us to analyze and compile multiple assemblies at once as a single servicing unit with extra optimizations allowed within the compile set.

Rich: Version bubbles is the feature that Simon is referring to, and is one of my favorite new features. By default, readytorun code is versionable, and that’s a great characteristic. I work a lot on containers and they have a key characteristic of immutability, which makes versionability unimportant. Version bubbles trade versionability for performance. That’s perfect for scenarios like containers where you’d much prefer greater performance and don’t have to give anything up for it. I’m looking forward to offering more nuanced and opinionated code in scenarios where it makes sense.

Rich: Versionability is a big topic, but I feel the need to expand on it a little. Let’s start with the book of the runtime. “When changes to managed code are made, we have to make sure that all the artifacts in a native code image only depend on information in other modules that cannot change without breaking the compatibility rules. What is interesting about this problem is that the constraints only come into play when you cross module boundaries.” Inlining is the perfect example. Methods can be inlined within the same assembly (equivalent to “module”) because the method being inlined and the method it is being inlined into reside within the same compatibility boundary. You cannot update one without updating the other. If you inline across assemblies boundaries, then the original code (that was inlined) could change and then a performance optimization is now exhibiting functionally incorrect behavior. That’s very bad. Version bubbles enable redefining the version boundary, but it is up to you to maintain that contract, and it isn’t a .NET code generation bug if you don’t.

Rich: Cross-compilation is another really important feature. You’ll be able to produce native code for Arm64 on an x64 machine and vice versa. For example, when you want to generate Arm64 code on an x64 machine, the SDK will acquire the Arm64 RyuJIT compiled for x64 so that it will run on an x64 machine. Cross-compilation is a key tenet of the architecture.

Could crossgen2 ever be used to target a runtime other than CoreCLR? For example, to enable the native AOT form factor?

Simon: Yes – much of the current Crossgen2 code is shared with the NativeAOT project which targets a different runtime. The managed type system implementation has been designed with extension points to allow for this flexibility.

What’s with the name? What’s the name you would prefer and why?

Simon: Crossgen originally started life as a cross-architecture AOT code generator for Windows Phone.

Rich: At one point, I tried to rename the tool “genr2r”, like “generator” but “r2r” at the end for “ready-to-run” but no one else was keen on that idea. At this point, I’m hoping that we’ll revert to just calling the tool “crossgen” after we’ve dropped our use of the existing crossgen tool.

Closing

First, thanks Simon for taking some time to tell us all about crossgen2. We also appreciate all your efforts on crossgen2. Simon has since moved to the Cosmos DB team. They use .NET, too!

While many of you will not use crossgen2 directly, you will certainly take advantage of the .NET platform being more optimized with this new tool. Going forward, crossgen2 will enables us even more options to make higher performance choices for the platform and for your code.

This post was the first one that I’ve posted in a conversational style. Did you like it? Should we do this again? If so, which topics should we have a conversation about next?

The post Conversation about crossgen2 appeared first on .NET Blog.


source https://devblogs.microsoft.com/dotnet/conversation-about-crossgen2/

What’s new in dotnet monitor

We’ve previously introduced dotnet monitor as an experimental tool to access diagnostics information in a dotnet process. We’re now pleased to announce dotnet monitor has graduated to a supported tool in the .NET ecosystem. dotnet monitor will be fully supported beginning with our first stable release later this year.

If you are new to dotnet monitor , we recommend checking out the official documentation which includes walkthroughs on using dotnet monitor on a local machine, with Docker, and Kubernetes,

This blog post details some of the new major features in the preview4 release of dotnet monitor:

  • Egress providers
  • Custom metrics
  • Security and Hardening

Egress providers

In previous previews, the only way to egress diagnostic artifacts from dotnet monitor was via the HTTP response stream. While this works well over reliable connections, this becomes increasingly challenging for very large artifacts and less reliable connections.

In preview4, you can configure dotnet monitor to egress artifacts to other destinations: Azure Blob Storage and the local filesystem. It is possible to specify multiple egress providers via configuration as shown in the example below:

{
    "Egress": {
        "Providers": {
            "sampleBlobStorageEgressProvider": {
                "type": "azureBlobStorage",
                "accountUri": "https://contoso.blob.core.windows.net",
                "containerName": "dotnet-monitor",
                "blobPrefix": "artifacts",
                "accountKeyName": "MonitorBlobAccountKey"
            }
        },
        "Properties": {
            "MonitorBlobAccountKey": "accountKey"
        }
    }
}

Once configured, at the time of triggering the artifact collection via an HTTP request, you can now specify which egress provider to use. With the configuration above, you can now make the following request:

GET /dump/?egressProvider=sampleBlobStorageEgressProvider HTTP/1.1

For more detailed instructions on configuring egress providers, look at the egress configuration documentation

Custom metrics

In addition to the collection of System.Runtime and Microsoft.AspNetCore.Hosting metrics, it is now possible to collect additional metrics (emitted via EventCounters) for exporting in the Prometheus exposition format.

You can configure dotnet monitor to collect additional metrics as shown in the example below:

{
  "Metrics": {
    "Providers": [
      {
        "ProviderName": "Microsoft-AspNetCore-Server-Kestrel"
      }
    ]
  }
}

For more detailed instructions on collecting custom metric, look at the metrics configuration documentation

Security and Hardening

Requiring authentication is part of the work that’s gone into hardening dotnet monitor to make it suitable for deployment in production environments. Additionally, to protect the credentials sent over the wire as part of authentication, dotnet monitor will also default to requiring that the underlying channel uses HTTPS.

In preview4 the /processes, /dump, /gcdump, /trace, and /logs API endpoints will require authentication. The /metrics endpoint will still be available without authentication on a separately configured metricsUrl for scraping via external tools like Prometheus.

In the local machine scenario with .NET SDK already installed, dotnet monitor will default to using ASP.NET Core HTTPS development certificate. If running on Windows, we also enable Windows authentication for secure experience as an alternative to API token auth.

Some steps in configuring dotnet monitor securely have been omitted for brevity in the blog post. We recommend looking at the official documentation for detailed instructions.

To get started with dotnet monitor in production, you will require an SSL certificate and an API Token.

Generating an SSL Certificate.

To configure dotnet monitor to run securely, you will need to generate an SSL certificate with an EKU for server usage. You can either request this certificate from your certificate authority or generate a self-signed certificate.

If you wish to generate another self-signed certificate for use on another machine you may do so by invoking the dotnet dev-certs tool:

dotnet dev-certs https -export-path self-signed-certificate.pfx -p <your-cert-password>

Generating an API token

You should generate a 32-byte cryptographically random secret to use an API token:

dotnet monitor generatekey

That should produce an output that resembles this:

Authorization: MonitorApiKey H2O2yT1c9yLkbDnU9THxGSxje+RhGwhjjTGciRJ+cx8=
ApiKeyHash: B4D54269DB7D948A8C640DB65B46D2D705A516134DA61CD97E424AC08E5021ED
ApiKeyHashType: SHA256

Once you have both an SSL certificate and an API Token generated, you can configure dotnet monitor to respond to authenticated HTTP requests over a secure TLS channel using the following configuration:

{
  "ApiAuthentication": {
    "ApiKeyHash": "<HASHED-TOKEN>",
    "ApiKeyHashType": "SHA256"
  },
  "Kestrel": {
    "Certificates": {
      "Default":{
        "Path": "<path-to-cert.pfx>",
        "Password": "<your-cert-password>"
      }
    }
  }
}

When using Windows Authentication, your browser will automatically handle the Windows authentication challenge. If you are using an API Key, you must specify it via the Authorization header on HTTP requests

curl.exe -H "Authorization: MonitorApiKey H2O2yT1c9yLkbDnU9THxGSxje+RhGwhjjTGciRJ+cx8=" https://localhost:52323/processes

Roadmap

We will continue to iterate on dotnet monitor with monthly updates until we’ll release a stable version later this year. dotnet monitor supports .NET Core 3.1 as well as .NET 5 and later.

Conclusion

We are excited to introduce this major update to dotnet monitor and want your feedback. Let us know what we can do to make it easier to diagnose what’s wrong with your .NET application.

Let us know what you think!.

The post What’s new in dotnet monitor appeared first on .NET Blog.


source https://devblogs.microsoft.com/dotnet/whats-new-in-dotnet-monitor/

UML Diagrams Full Course (Unified Modeling Language)


Curriculum for the course UML Diagrams Full Course (Unified Modeling Language)

Learn about how to use UML diagrams to visualize the design of databases or systems. You will learn the most widely used Unified Modeling Language diagrams, their basic notation, and applications. UML diagrams are frequently used in software development. Course from Ave Coders. Check out their channel: https://www.youtube.com/channel/UCBvWPPieVSwyvfXvspW2vAg ⭐️ Course Contents ⭐️ ⌨️ (0:00:00) Course Introduction ⌨️ (0:02:50) Overview of the main Diagrams in UML 2.0 ⌨️ (0:09:39) Class Diagram ⌨️ (0:17:43) Component Diagram ⌨️ (0:25:27) Deployment Diagram ⌨️ (0:31:49) Object Diagram ⌨️ (0:37:41) Package Diagram ⌨️ (0:45:07) Composite Structure Diagram ⌨️ (0:51:32) Profile Diagram ⌨️ (0:57:09) Use Case Diagram ⌨️ (1:04:29) Activity Diagram ⌨️ (1:10:08) State Machine Diagram ⌨️ (1:17:17) Sequence Diagram ⌨️ (1:26:12) Communications Diagram ⌨️ (1:33:57) Interaction Overview Diagram ⌨️ (1:37:11) Timing Diagram -- Learn to code for free and get a developer job: https://www.freecodecamp.org Read hundreds of articles on programming: https://freecodecamp.org/news And subscribe for new videos on technology every day: https://youtube.com/subscription_center?add_user=freecodecamp

Watch Online Full Course: UML Diagrams Full Course (Unified Modeling Language)


Click Here to watch on Youtube: UML Diagrams Full Course (Unified Modeling Language)


This video is first published on youtube via freecodecamp. If Video does not appear here, you can watch this on Youtube always.


Udemy UML Diagrams Full Course (Unified Modeling Language) courses free download, Plurasight UML Diagrams Full Course (Unified Modeling Language) courses free download, Linda UML Diagrams Full Course (Unified Modeling Language) courses free download, Coursera UML Diagrams Full Course (Unified Modeling Language) course download free, Brad Hussey udemy course free, free programming full course download, full course with project files, Download full project free, College major project download, CS major project idea, EC major project idea, clone projects download free

Loop alignment in .NET 6

When writing a software, developers try their best to maximize the performance they can get from the code they have baked into the product. Often, there are various tools available to the developers to find that last change they can squeeze into their code to make their software run faster. But sometimes, they might notice slowness in the product because of a totally unrelated change. Even worse, when measured the performance of a feature in a lab, it might show instable performance results that looks like the following BubbleSort graph1. What could possibly be introducing such flakiness in the performance?

Instable bubble sort, Loop alignment in .NET 6

To understand this behavior, first we need to understand how the machine code generated by the compiler is executed by the CPU. CPU fetch the machine code (also known as instruction stream) it need to execute. The instruction stream is represented as series of bytes known as opcode. Modern CPUs fetch the opcodes of instructions in chunks of 16-bytes (16B), 32-bytes (32B) or 64-bytes (64B). The CISC architecture has variable length encoding, meaning the opcode representing each instruction in the instruction stream is of variable length. So, when the Fetcher fetches a single chunk, it doesn’t know at that point the start and end of an instruction. From the instruction stream chunk, CPU’s Pre-decoder identifies the boundary and lengths of instruction, while the Decoder decodes the meaning of the opcodes of those individual instructions and produce micro-operations (μops) for each instruction. These μops are fed to the Decoder Stream Buffer (DSB) which is a cache that indexes μops with the address from where the actual instruction was fetched. Before doing a fetch, CPU first checks if the DSB contains the μops of the instruction it wants to fetch. If it is already present, there is no need to do a cycle of instruction fetching, pre-decoding and decoding. Further, there also exist Loop Stream Detector (LSD) that detects if a stream of μops represents a loop and if yes, it skips the front-end fetch and decode cycle and continue executing the μops until a loop misprediction happens.

Code alignment

Let us suppose we are executing an application on a CPU that fetches instruction in 32B chunks. The application has a method having a hot loop inside it. Every time the application is run, the loop’s machine code is placed at different offset. Sometimes, it could get placed such that the loop body does not cross the 32B address boundary. In those cases, the instruction fetcher could fetch the machine code of the entire loop in one round. On the contrary, if the loop’s machine code is placed such that the loop body crosses the 32B boundary, the fetcher would have to fetch the loop body in multiple rounds. A developer cannot control the variation in fetching time because that is dependent on where the machine code of the loop is present. In such cases, you could see instability in the method’s performance. Sometimes, the method runs faster because the loop was aligned at fetcher favorable address while other times, it can show slowness because the loop was misaligned and fetcher spent time in fetching the loop body. Even a tiny change unrelated to the method body (like introducing a new class level variable, etc.) can affect the code layout and misalign the loop’s machine code. This is the pattern that can be seen in bubble sort benchmark above. This problem is mostly visible in CISC architectures because of variable length encoding of the instructions. The RISC architectures CPUs like Arm have fixed length encoding and hence might not see such a large variance in the performance.

To solve this problem, compilers perform alignment of the hot code region to make sure the code’s performance remains stable. Code alignment is a technique in which one or more NOP instructions are added by the compiler in the generated machine code just before the hot region of the code so that the hot code is shifted to an address that is mod(16), mod(32) or mod(64). By doing that, maximum fetching of the hot code can happen in fewer cycles. Study shows that by performing such alignments, the code can benefit immensely. Additionally, the performance of such code is stable since it is not affected by the placement of code at misaligned address location. To understand the code alignment impact in details, I would highly encourage to watch the Causes of Performance Swings due to Code Placement in IA talk given by Intel’s engineer Zia Ansari at 2016 LLVM Developer’s Meeting.

In .NET 5, we started aligning methods at 32B boundary. In .NET 6, we have added a feature to perform adaptive loop alignment that adds NOP padding instructions in a method having loops such that the loop code starts at mod(16) or mod(32) memory address. In this blog, I will describe the design choices we made, various heuristics that we accounted for and the analysis and implication we studied on 100+ benchmarks that led us to believe that our current loop alignment algorithm will be beneficial in stabilizing and improving the performance of .NET code.

Heuristics

When we started working on this feature, we wanted to accomplish the following things: – Identify hot inner most loop(s) that executes very frequently. – Add NOP instructions before the loop code such that the first instruction within the loop falls on 32B boundary.

Below is an example of a loop IG04~IG05 that is aligned by adding 6-bytes of align instruction. In this post, although I will represent the padding as align [X bytes] in the disassembly, we actually emit multi-byte NOP for the actual padding.

...
00007ff9a59ecff6        test     edx, edx
00007ff9a59ecff8        jle      SHORT G_M22313_IG06
00007ff9a59ecffa        align    [6 bytes]
; ............................... 32B boundary ...............................
G_M22313_IG04:
00007ff9a59ed000        movsxd   r8, eax
00007ff9a59ed003        mov      r8d, dword ptr [rcx+4*r8+16]
00007ff9a59ed008        cmp      r8d, esi
00007ff9a59ed00b        jge      SHORT G_M22313_IG14

G_M22313_IG05:
00007ff9a59ed00d        inc      eax
00007ff9a59ed00f        cmp      edx, eax
00007ff9a59ed011        jg       SHORT G_M22313_IG04

A simple approach would be to add padding to all the hot loops. However, as I will describe in Memory cost section below, there is a cost associated with padding all the loops of method. There are lot of considerations that we need to take into account to get stable performance boost for the hot loops, and ensure that the performance is not downgraded for loops that don’t benefit from padding.

Alignment boundary

Depending on the design of processors the software running on them benefit more if the hot code is aligned at 16B, 32B or 64B alignment boundary. While the alignment should be in multiples of 16 and most recommended boundary for major hardware manufacturers like Intel, AMD and Arm is 32 byte, we had 32 as our default alignment boundary. With adaptive alignment (controlled using COMPlus_JitAlignLoopAdaptive environment variable and is set to be 1 by default), we will try to align a loop at 32 byte boundary. But if we do not see that it is profitable to align a loop on 32 byte boundary (for reasons listed below), we will try to align that loop at 16 byte boundary. With non-adaptive alignment (COMPlus_JitAlignLoopAdaptive=0), we will always try to align a loop to a 32 byte alignment by default. The alignment boundary can also be changed using COMPlus_JitAlignLoopBoundary environment variable. Adaptive and non-adaptive alignment differs by the amount of padding bytes added, which I will discuss in Padding amount section below.

Loop selection

There is a cost associated with a padding instruction. Although NOP instruction is cheap, it takes few cycles to fetch and decode it. So, having too many NOP or NOP instructions in hot code path can adversely affect the performance of the code. Hence, it will not be appropriate to align every possible loop in a method. That is the reason, LLVM has -align-all-* or gcc has -falign-loops flags to give the control to developers, to let them decide which loops should be aligned. Hence, the foremost thing that we wanted to do is to identify the loops in the method that will be most beneficial with the alignment. To start with, we decided to align just the non-nested loops whose block-weight meets a certain weight threshold (controlled by COMPlus_JitAlignLoopMinBlockWeight). Block weight is a mechanism by which the compiler knows how frequently a particular block executes, and depending on that, performs various optimizations on that block. In below example, j-loop and k-loop are marked as loop alignment candidates, provided they get executed more often to satisfy the block weight criteria. This is done in optIdentifyLoopsForAlignment method of the JIT.

If a loop has a call, the instructions of caller method will be flushed and those of callee will be loaded. In such case, there is no benefit in aligning the loop present inside the caller. Therefore, we decided not to align loops that contains a method call. Below, l-loop, although is non-nested, it has a call and hence we will not align it. We filter such loops in AddContainsCallAllContainingLoops.

void SomeMethod(int N, int M) {
    for (int i = 0; i < N; i++) {

        // j-loop is alignment candidate
        for (int j = 0; j < M; j++) {
            // body
        }
    }

    if (condition) {
        return;
    }

    // k-loop is alignment candidate
    for (int k = 0; k < M + N; k++) {
        // body
    }

    for (int l = 0; l < M; l++) {
        // body
        OtherMethod();
    }
}

Once loops are identified in early phase, we proceed forward with advanced checks to see if padding is beneficial and if yes, what should be the padding amount. All those calculations happen in emitCalculatePaddingForLoopAlignment.

Loop size

Aligning a loop is beneficial if the loop is small. As the loop size grows, the effect of padding disappears because there is already lot of instruction fetching, decoding and control flow happening that it does not matter the address at which the first instruction of a loop is present. We have defaulted the loop size to 96 bytes which is 3 X 32-byte chunks. In other words, any inner loop that is small enough to fit in 3 chunks of 32B each, will be considered for alignment. For experimentation, that limit can be changed using COMPlus_JitAlignLoopMaxCodeSize environment variable.

Aligned loop

Next, we check if the loop is already aligned at the desired alignment boundary (32 byte or 16 byte for adaptive alignment and 32 byte for non-adaptive alignment). In such cases, no extra padding is needed. Below, the loop at IG10 starts at address 0x00007ff9a91f5980 == 0 (mod 32) is already at desired offset and no extra padding is needed to align it further.

00007ff9a91f597a        cmp      dword ptr [rbp+8], r8d
00007ff9a91f597e        jl       SHORT G_M24050_IG12
; ^^^^^^^^^^^^^^^^^^^^^^^^^^^^^^^ (jl: 0) 32B boundary ...............................
00007ff9a91f5980        align    [0 bytes]

G_M24050_IG10:
00007ff9a91f5980        movsxd   rdx, ecx
00007ff9a91f5983        mov      r9, qword ptr [rbp+8*rdx+16]
00007ff9a91f5988        mov      qword ptr [rsi+8*rdx+16], r9
00007ff9a91f598d        inc      ecx
00007ff9a91f598f        cmp      r8d, ecx
00007ff9a91f5992        jg       SHORT G_M24050_IG10

We have also added a “nearly aligned loop” guard. There can be loops that do not start exactly at 32B boundary, but they are small enough to entirely fit in a single 32B chunk. All the code of such loops can be fetched with a single instruction fetcher request. In below example, the instructions between the two 32B boundary (marked with 32B boundary) fits in a single chunk of 32 bytes. The loop IG04 is part of that chunk and its performance will not improve if we add extra padding to it to make the loop start at 32B boundary. Even without padding, the entire loop will be fetched anyway in a single request. Hence, there is no point aligning such loops.

; ^^^^^^^^^^^^^^^^^^^^^^^^^^^^^^^ (mov: 3) 32B boundary ...............................
00007ff9a921a903        call     CORINFO_HELP_NEWARR_1_VC
00007ff9a921a908        xor      ecx, ecx
00007ff9a921a90a        mov      edx, dword ptr [rax+8]
00007ff9a921a90d        test     edx, edx
00007ff9a921a90f        jle      SHORT G_M24257_IG05
00007ff9a921a911        align    [0 bytes]

G_M24257_IG04:
00007ff9a921a911        movsxd   r8, ecx
00007ff9a921a914        mov      qword ptr [rax+8*r8+16], rsi
00007ff9a921a919        inc      ecx
00007ff9a921a91b        cmp      edx, ecx
00007ff9a921a91d        jg       SHORT G_M24257_IG04

G_M24257_IG05:
00007ff9a921a91f        add      rsp, 40
; ^^^^^^^^^^^^^^^^^^^^^^^^^^^^^^^ (add: 3) 32B boundary ...............................

This was an important guard that we added in our loop alignment logic. Without this, imagine a loop of size 20 bytes that starts at offset mod(32) + 1. To align this loop, it needed padding of 31 bytes which might not be beneficial in certain scenarios where 31 byte NOP instructions are on hot code path. The “nearly aligned loop” protects us from such scenarios.

The “nearly aligned loop” check is not restrictive to just small loop that fits in a single 32B chunk. For any loop, we calculate the minimum number of chunks needed to fit the loop code. Now, if the loop is already aligned such that it occupies those minimum number of chunks, then we can safely ignore padding the loop further because padding will not make it any better.

In below example, the loop IG04 is 37 bytes long (00007ff9a921c690 - 00007ff9a921c66b = 37). It needs minimum 2 blocks of 32B chunk to fit. If the loop starts anywhere between mod(32) and mod(32) + (64 - 37), we can safely skip the padding because the loop is already placed such that its body will be fetched in 2 request (32 bytes in 1st request and 5 bytes in next request).

; ^^^^^^^^^^^^^^^^^^^^^^^^^^^^^^^ (xor: 2) 32B boundary ...............................
00007ff9a921c662        mov      r12d, dword ptr [r14+8]
00007ff9a921c666        test     r12d, r12d
00007ff9a921c669        jle      SHORT G_M11250_IG07
00007ff9a921c66b        align    [0 bytes]

G_M11250_IG04:
00007ff9a921c66b        cmp      r15d, ebx
00007ff9a921c66e        jae      G_M11250_IG19
00007ff9a921c674        movsxd   rax, r15d
00007ff9a921c677        shl      rax, 5
00007ff9a921c67b        vmovupd  ymm0, ymmword ptr[rsi+rax+16]
; ^^^^^^^^^^^^^^^^^^^^^^^^^^^^^^^ (movupd: 1) 32B boundary ...............................
00007ff9a921c681        vmovupd  ymmword ptr[r14+rax+16], ymm0
00007ff9a921c688        inc      r15d
00007ff9a921c68b        cmp      r12d, r15d
00007ff9a921c68e        jg       SHORT G_M11250_IG04

G_M11250_IG05:
00007ff9a921c690        jmp      SHORT G_M11250_IG07
; ^^^^^^^^^^^^^^^^^^^^^^^^^^^^^^^ (xor: 1) 32B boundary ...............................

To recap, so far, we have identified the hot nested loops in a method that needs padding, filtered out the ones that has calls, filtered the ones that are big than our threshold and verified if the first instruction of the loop is placed such that extra padding will align that instruction at the desired alignment boundary.

Padding amount

To align a loop, NOP instructions need to be inserted before the loop starts so that the first instruction of the loop starts at an address which is mod(32) or mod(16). It can be a design choice on how much padding we need to add to align a loop. E.g., for aligning a loop to 32B boundary, we can choose to add maximum padding of 31 bytes or can have a limitation on the padding amount. Since padding or NOP instructions are not free, they will get executed (either as part of the method flow or if the aligned loop is nested inside another loop) and hence we need to make a careful choice of how much padding should be added. With non-adaptive approach, if an alignment needs to happen at N bytes boundary, we will try to add at most N-1 bytes to align the first instruction of the loop. So, with 32B or 16B non-adaptive technique, we will try to align a loop to 32-byte or 16-byte boundary by adding at most 31 bytes or 15 bytes, respectively.

However, as mentioned above, we realized that adding lot of padding regresses the performance of the code. For example, if a loop which is 15 bytes long, starts at offset mod(32) + 2, with non-adaptive 32B approach, we would add 30 bytes of padding to align that loop to the next 32B boundary address. Thus, to align a loop that is 15 bytes long, we have added extra 30 bytes to align it. If the loop that we aligned was a nested loop, the processor would be fetching and decoding these 30 bytes NOP instructions on every iteration of outer loop. We have also increased the size of method by 30 bytes. Lastly, since we would always try to align a loop at 32B boundary, we might add more padding compared to the amount of padding needed, had we had to align the loop at 16B boundary. With all these shortcomings, we came up with an adaptive alignment algorithm.

In adaptive alignment, we would limit the amount of padding added depending on the size of the loop. In this technique, the biggest possible padding that will be added is 15 bytes for a loop that fits in one 32B chunk. If the loop is bigger and fits in two 32B chunks, then we would reduce the padding amount to 7 bytes and so forth. The reasoning behind this is that bigger the loop gets, it will have lesser effect of the alignment. With this approach, we could align a loop that takes 4 32B chunks if padding needed is 1 byte. With 32B non-adaptive approach, we would never align such loops (because of COMPlus_JitAlignLoopMaxCodeSize limit).

Max Pad (bytes) Minimum 32B blocks needed to fit the loop
15 1
7 2
3 3
1 4

Next, because of padding limit, if we cannot get the loop to align to 32B boundary, the algorithm will try to align the loop to 16B boundary. We reduce the max padding limit if we get here as seen in the table below.

Max Pad (bytes) Minimum 32B blocks to fit the loop
7 1
3 2
1 3

With the adaptive alignment model, instead of totally restricting the padding of a loop (because of padding limit of 32B), we will still try to align the loop on the next better alignment boundary.

Padding placement

If it is decided that padding is needed and we calculate the padding amount, the important design choice to make is where to place the padding instructions. In .NET 6, it is done naïvely by placing the padding instruction just before the loop starts. But as described above, that can adversely affect the performance because the padding instructions can fall on the execution path. A smarter way would be to detect some blind spots in the code before the loop and place it at such that the padding instruction do not get executed or are executed rarely. E.g., If we have an unconditional jump somewhere in the method code, we could add padding instruction after that unconditional jump. By doing this, we will make sure that the padding instruction is never executed but we still get the loop aligned at right boundary. Another place where such padding can be added is in code block or a block that executes rarely (based on Profile-Guided Optimization data). The blind spot that we select should be lexically before the loop that we are trying to align.

00007ff9a59feb6b        jmp      SHORT G_M17025_IG30

G_M17025_IG29:
00007ff9a59feb6d        mov      rax, rcx

G_M17025_IG30:
00007ff9a59feb70        mov      ecx, eax
00007ff9a59feb72        shr      ecx, 3
00007ff9a59feb75        xor      r8d, r8d
00007ff9a59feb78        test     ecx, ecx
00007ff9a59feb7a        jbe      SHORT G_M17025_IG32
00007ff9a59feb7c        align    [4 bytes]
; ............................... 32B boundary ...............................
G_M17025_IG31:
00007ff9a59feb80        vmovupd  xmm0, xmmword ptr [rdi]
00007ff9a59feb84        vptest   xmm0, xmm6
00007ff9a59feb89        jne      SHORT G_M17025_IG33
00007ff9a59feb8b        vpackuswb xmm0, xmm0, xmm0
00007ff9a59feb8f        vmovq    xmmword ptr [rsi], xmm0
00007ff9a59feb93        add      rdi, 16
00007ff9a59feb97        add      rsi, 8
00007ff9a59feb9b        inc      r8d
00007ff9a59feb9e        cmp      r8d, ecx
; ^^^^^^^^^^^^^^^^^^^^^^^^^^^^^^^ (cmp: 1) 32B boundary ...............................
00007ff9a59feba1        jb       SHORT G_M17025_IG31

In above example, we aligned loop IG31 with 4 bytes padding, but we have inserted the padding right before the first instruction of the loop. Instead, we can add that padding after the jmp instruction present at 00007ff9a59feb6b. That way, the padding will never be executed, but IG31 will still get aligned at desired boundary.

Memory cost

Lastly, there is a need to evaluate how much extra memory is allocated by the runtime for adding the extra padding before the loop. If the compiler aligns every hot loop, it can increase the code size of a method. There must be a right balance between the loop size, frequency of its execution, padding needed, padding placement to ensure only the loops that truly benefit with the alignment are padded. Another aspect is that the if the JIT, before allocating memory for the generated code, can evaluate how much padding is needed to align a loop, it will request precise amount of memory to accommodate the extra padding instruction. However, like in RyuJIT, we first generate the code (using our internal data structures), sum up the total instruction size and then determine the amount of memory needed to store the instructions. Next, it allocates the memory from runtime and lastly, it will emit and store the actual machine instructions in the allocated memory buffer. During code generation (when we do the loop alignment calculation), we do not know the offset where the loop will be placed in the memory buffer. In such case, we will have to pessimistically assume the maximum possible padding needed. If there are many loops in a method that would benefit from alignment, assuming maximum possible padding for all the loops would increase the allocation size of that method although the code size would be much smaller (depending on actual padding added).

Below graph demonstrates the code size and allocation size’s impact due to the loop alignment. Allocation size represents the amount of memory allocated to store the machine code of all the .NET libraries methods while code size represents the actual amount of memory needed to store method’s machine code. The code size is lowest for 32BAdaptive technique. This is because we have cut off the padding amount depending on the loop size, as discussed before. So from memory perspective, 32BAdaptive wins.

Size comparison 1

Allocation size in above graph is higher than the code size for all the implementation because we accounted for maximum possible padding for every loop during allocation size calculation. Ideally, we wanted to have allocation size same as code size. Below is another view that demonstrates the difference between the allocation size and code size. The difference is highest for 32B non-adaptive implementation and lowest with 16B non-adaptive. 32B adaptive is marginally higher than 16B non-adaptive, but again since the overall code size is minimal as compared to 16B/32B non-adaptive, 32BAdaptive is the winner.

Size comparison 2

However, to make sure that we know precise amount of padding we are going to add before allocating the memory, we devised a work around. During code generation, we know that the method starts at offset 0(mod 32). We calculate the padding needed to align the loop and update the align instruction with that amount. Thus, we would allocate the memory considering the real padding and would not allocate memory for loops for which we do not need padding. This works if the estimated size of all the instructions during code generation of a method matches the actual size during emitting those instructions. Sometimes, during emitting, we realize that it is optimal to have shorter encoding for an instruction and that deviates the estimated vs. actual size of that instruction. We cannot afford to have this misprediction happen for instruction that falls before the loop that we are about to align, because that would change the placement of the loop.

In below example, the loop starts at IG05 and during code generation, we know that by adding padding of 1 byte, we can align that loop at 0080 offset. But during emitting the instruction, if we decide to encode instruction_1 such that it just takes 2 bytes instead of 3 bytes (that we estimated), the loop will start from memory address 00007ff9a59f007E. Adding 1 byte of padding would make it start at 00007ff9a59f007F which is not what we wanted.

007A instruction_1  ; size = 3 bytes
007D instruction_2  ; size = 2 bytes

IG05:
007F instruction_3  ; start of loop
0083 instruction_4
0087 instruction_5
0089 jmp IG05

Hence, to account for this over-estimation of certain instructions, we compensate by adding extra NOP instructions. As seen below, with this NOP, our loop will continue to start at 00007ff9a59f007F and the padding of 1 byte will make it align at 00007ff9a59f0080 address.

00007ff9a59f007A instruction_1  ; size = 2 bytes
00007ff9a59f007C NOP            ; size = 1 byte (compensation)
00007ff9a59f007D instruction_2  ; size = 2 bytes

IG05:
00007ff9a59f007F instruction_3  ; start of loop
00007ff9a59f0083 instruction_4
00007ff9a59f0087 instruction_5
0089 jmp IG05

With that, we can precisely allocate memory for generated code such that the difference between allocated and actual code size is zero. In the long term, we want to address the problem of over-estimation so that the instruction size is precisely known during code generation and it matches during emitting the instruction.

Impact

Finally, let’s talk about the impact of this work. While I have done lots and lots of analysis to understand the loop alignment impact on our various benchmarks, I would like to highlight two graphs that demonstrates both, the increased stability as well as improved performance due to the loop alignment.

In below performance graph of Bubble sort, data point 1 represents the point where we started aligning methods at 32B boundary. Data point 2 represents the point where we started aligning inner loops that I described above. As you can see, the instability has reduced by heavy margin and we also gained performance.

Stable bubble sort

Below is another graph of “LoopReturn” benchmark2 ran on Ubuntu x64 box where we see similar trend.

Ubuntu loop return

Below is the graph that shows the comparison of various algorithms that we tried to understand the loop alignment impact across benchmarks. The measurements in the graph are for microbenchmarks and in it, we compared the performance characteristics using various alignment techniques. 32B and 16B represents non-adaptive technique while 32BAdaptive represents 32B adaptive technique.

Bench comparison, Loop alignment in .NET 6

32B adaptive improves sooner after 171 benchmarks as compared to the next better approach which is 32B non-adaptive that gains performance after 241 benchmarks. We get maximum performance benefit sooner with 32B adaptive approach.

Edge cases

While implementing the loop alignment feature, I came across several edge cases that are worth mentioning. We identify that a loop needs alignment by setting a flag on the first basic block that is part of the loop. During later phases, if the loop gets unrolled, we need to make sure that we remove the alignment flag from that loop because it no longer represents the loop. Likewise, for other scenarios like loop cloning, or eliminating bogus loops, we had to make sure that we updated the alignment flag appropriately.

Future work

One of our planned future work is to add the “Padding placement” in blind spots as I described above. Additionally, we need to not just restrict aligning the inner loops but outer loops whose relative weight is higher than the inner loop. In below example, i-loop executes 1000 times, while the j-loop executes just 2 times in every iteration. If we pad the j-loop we will end up making the padded instruction execute 1000 times which can be expensive. Better approach would be to instead pad and align the i-loop.

for (int i = 0; i < 1000; i++) {
    for (int j = 0; j < 2; j++) {
        // body
    }
}

Lastly, the loop alignment is only enabled for x86 and x64 architecture, but we would like to take it forward and support Arm32 and Arm64 architectures as well.

Loop alignment in other compilers

For native or ahead of time compilers, it is hard to predict which loop will need alignment because the target address where the loop will be placed can only be known during runtime and not during ahead of time compilation. However, certain native runtimes at least give an option to the user to let them specify the alignment.

GCC

GCC provides -falign-functions attribute that the user can add on top of a function. More documentation can be seen on the gcc documentation page under “aligned” section. This will align the first instruction of every function at the specified boundary. It also provides options for -falign-loops, -falign-labels and -falign-jumps that will align all loops, labels or jumps in the entire code getting compiled. I did not inspect the GCC code, but looking at these options, it has several limitations. First, the padding amount is fixed and can anywhere between 0 and (N – 1) bytes. Second, the alignment will happen for the entire code base and cannot be restricted to a portion of files, methods, loops or hot regions.

LLVM

Same as GCC, dynamic alignment during runtime is not possible so LLVM too exposes an option of alignment choice to the user. This blog gives a good overview of various options available. One of the options that it gives is align-all-nofallthru-blocks which will not add padding instructions if the previous block can reach the current block by falling through because that would mean that we are adding NOPs in the execution path. Instead, it tries to add the padding at blocks that ends with unconditional jumps. This is like what I mentioned above under “Padding placement”.

Conclusion

Code alignment is a complicated mechanism to implement in a compiler and it is even harder to make sure that it optimizes the performance of a user code. We started with a simple problem statement and expectation, but during implementation, had to conduct various experiments to ensure that we cover maximum possible cases where the alignment would benefit. We also had to take into account that the alignment does not affect the performance adversely and devised mechanism to minimize such surface areas. I owe a big thanks to Andy Ayers who provided me guidance and suggested some great ideas during the implementation of loop alignment.

References

  1. BubbleSort2 benchmark is part of .NET’s micro-benchmarks suite and the source code is in dotnet/performance repository. Results taken in .NET perf lab can be seen on BubbleSort2 result page.
  2. LoopReturn benchmark is part of .NET’s micro-benchmarks suite and the source code is in dotnet/performance repository. Results taken in .NET perf lab can be seen on LoopReturn result page.

The post Loop alignment in .NET 6 appeared first on .NET Blog.


source https://devblogs.microsoft.com/dotnet/loop-alignment-in-net-6-2/

Create an Instagram Clone with React, Tailwind CSS, Firebase - Tutorial


Curriculum for the course Create an Instagram Clone with React, Tailwind CSS, Firebase - Tutorial

Learn how to create an Instagram clone with React and JavaScript! This project uses React (custom hooks, useContext, useState, useEffect, useRef), Firebase (Firestore/auth), Tailwind CSS, LoadTest, Lighthouse, Vercel, React Testing Library and Cypress E2E Testing. This React project has multiple pages: login, sign up, dashboard (to view/like/comment on photos), and user profiles. The sign-in page connects to Firebase when a user tries to sign in, and when a user signs up, Firebase auth is used to store the user in the Firebase auth database. After the application is built you will learn how to deploy it to Vercel. ✏️ Course created by Karl Hadwen. Check out his channel: https://www.youtube.com/c/CognitiveSurge 💻 Code: https://github.com/karlhadwen/instagram ⭐️ Course Contents ⭐️ ⌨️ (0:00:00) Introduction ⌨️ (0:05:37) Showcase ⌨️ (0:15:28) Create React App (yarn) ⌨️ (0:18:22) Project Folder Structure ⌨️ (0:20:26) Installing Dependencies ⌨️ (0:22:47) Refactoring unnecessary files, refactoring code ⌨️ (0:29:18) Install ESLint ⌨️ (0:33:06) Creating Folder Structure & Architecture ⌨️ (0:43:05) Setup Firebase ⌨️ (0:44:22) Firestore ⌨️ (0:46:44) Firestore Rules ⌨️ (0:48:43) Firestore (Collections & Docs) ⌨️ (0:51:00) Firebase Authentication ⌨️ (0:53:59) Realtime Database (Explanation) ⌨️ (0:54:45) createContext in firebase.js ⌨️ (1:02:34) Creating App in Firebase ⌨️ (1:09:15) Start working on Login Page ⌨️ (1:10:17) Install React Router Dom ⌨️ (1:18:15) Create Routes ⌨️ (1:21:51) Continue working on Login Page (Part 2) ⌨️ (1:26:35) Tailwind.css Introduction ⌨️ (1:31:34) Continue working on Login Page (Part 3) ⌨️ (1:32:35) Install more dependencies ⌨️ (1:36:30) Change how all scripts work ⌨️ (1:40:21) yarn add postcss -D ⌨️ (1:40:57) Create components folder ⌨️ (1:34:19) Tailwind.css setup ⌨️ (1:35:51) Completed Tailwind Setup, Continue working on Login Page (Part 4) ⌨️ (1:39:28) Interjection: Field Value ⌨️ (1:41:56) Continue working on Login Page ⌨️ (2:01:47) Tailwind.config ⌨️ (2:06:05) Login Functionality (with Firebase) ⌨️ (2:11:12) Signup Page ⌨️ (2:22:53) Check for user created is a duplicate ⌨️ (2:54:49) Not Found & Dashboard Page ⌨️ (3:01:11) Created Timeline Component ⌨️ (3:01:28) Created Sidebar Component ⌨️ (3:01:47) Created Header Component ⌨️ (3:04:14) use-auth-listener.js Hook ⌨️ (3:11:23) users.js UserContext ⌨️ (3:15:38) Back to Header Component ⌨️ (3:42:21) Working on Dashboard Page ⌨️ (3:45:59) Working on Sidebar Component ⌨️ (3:46:15) use-user.js hook ⌨️ (4:04:20) In user.js ⇒ Introduction to prop types ⌨️ (4:25:03) Created Timeline.js ⌨️ (4:25:43) Explanation on useMemo ⌨️ (4:27:45) Add WhyDidYouRender ⌨️ (4:29:53) Struggling with some issues ⌨️ (4:42:42) Finally Figuring out some problems with WhyDidYouRender ⌨️ (4:50:41) Working on suggestion.js (sidebar completed) ⌨️ (4:59:20) Get suggested profiles ⌨️ (5:16:28) Functionality: Remove followed user from suggestion ⌨️ (5:23:12) Functionality: Update user’s following & followers ⌨️ (5:34:18) Overview on Timeline ⌨️ (5:40:47) Creating Post Component ⌨️ (5:42:57) Creating more custom hooks (usePhotos) ⌨️ (6:04:16) Rendering out the photos (using React skeleton) ⌨️ (6:10:55) Start work on Post Component ⌨️ (6:15:18) Components within Post ⌨️ (6:16:03) Header Component ⌨️ (6:20:56) Image & Actions ⌨️ (6:27:32) Service call in Firebase ⌨️ (6:42:44) Show Comments ⌨️ (6:51:13) Add Comments ⌨️ (7:12:26) Adding Protected Routes ⌨️ (7:27:13) Profile ⌨️ (7:30:20) Lazy load explanation ⌨️ (7:45:23) Continue working on Profile Page ⌨️ (7:58:48) Header Component in Profile Page ⌨️ (8:02:14) Profile Specific Header ⌨️ (8:18:00) Get User Photos ⌨️ (8:37:52) Continue working on header ⌨️ (9:20:31) Information in header ⌨️ (9:37:09) Photos Component in Profile Page ⌨️ (9:50:07) Recap of everything we’ve done ⌨️ (9:52:55) Start of Review ⌨️ (9:55:33) Not found header ⌨️ (9:57:04) Review of usePhotos, useUsers, isUserLoggedIn, ProtectedRoute ⌨️ (9:58:35) Review of contexts: firebase.js and user.js ⌨️ (9:58:57) Review of Routes & Posts ⌨️ (10:01:31) loadtest (Npm install -g loadtest) ⌨️ (10:15:27) Create a production build ⌨️ (10:38:28) Deployment to Vercel done but with issues ⌨️ (10:51:47) Issues fixed ⌨️ (10:52:19) Lighthouse ⌨️ (11:02:27) Wrapping up ⌨️ (11:04:13) Changes and Refactoring (Fixing Bugs) ⌨️ (11:48:50) Quick Look at Paid Version ⌨️ (11:49:59) Cypress ⌨️ (11:54:08) Signing Off -- Learn to code for free and get a developer job: https://www.freecodecamp.org Read hundreds of articles on programming: https://freecodecamp.org/news And subscribe for new videos on technology every day: https://youtube.com/subscription_center?add_user=freecodecamp

Watch Online Full Course: Create an Instagram Clone with React, Tailwind CSS, Firebase - Tutorial


Click Here to watch on Youtube: Create an Instagram Clone with React, Tailwind CSS, Firebase - Tutorial


This video is first published on youtube via freecodecamp. If Video does not appear here, you can watch this on Youtube always.


Udemy Create an Instagram Clone with React, Tailwind CSS, Firebase - Tutorial courses free download, Plurasight Create an Instagram Clone with React, Tailwind CSS, Firebase - Tutorial courses free download, Linda Create an Instagram Clone with React, Tailwind CSS, Firebase - Tutorial courses free download, Coursera Create an Instagram Clone with React, Tailwind CSS, Firebase - Tutorial course download free, Brad Hussey udemy course free, free programming full course download, full course with project files, Download full project free, College major project download, CS major project idea, EC major project idea, clone projects download free

Django 3 Course - Python Web Framework (+ pandas, matplotlib, & more)


Curriculum for the course Django 3 Course - Python Web Framework (+ pandas, matplotlib, & more)

Learn Django, a Python web framework, in this full course. The course also covers pandas, matplotlib, JavaScript, ajax, xhtml2pdf, dropzone.js, and more! You will learn about: ➜ django concepts (models, views, templates, signals and more!) ➜ pandas dataframes ➜ matplotlib and seaborn integration ➜ pdf integration ➜ javascript ajax integration ➜ dropzone js for csv files ➜ working with base64 ➜ and more! ✏️ Course developed by Pyplane. Check out their channel: https://www.youtube.com/channel/UCQtHyVB4O4Nwy1ff5qQnyRw 💻 Source code and starter files: https://blog.pyplane.com/blog/django-report-app/ ⭐️ Coruse Contents ⭐️ ⌨️ (0:00:00​) intro ⌨️ (0:03:35​) django project setup part 1 ⌨️ (0:09:56​) django project setup part 2 ⌨️ (0:15:11​) django project setup part 3 ⌨️ (0:25:21​) customer model ⌨️ (0:30:49​) product model ⌨️ (0:36:30​) profile model + post_save signal ⌨️ (0:48:14​) sale model ⌨️ (1:12:05​) m2m_changed signal ⌨️ (1:19:15​) reports model ⌨️ (1:24:14​) first view and template ⌨️ (1:33:25​) working on the sales list ⌨️ (1:39:58​) navigating to the detail page ⌨️ (1:49:27​) creating the search form ⌨️ (1:58:15​) get the data from the search form ⌨️ (2:01:08​) first querysets and dataframes ⌨️ (2:17:05​) display dataframes in the templates ⌨️ (2:24:04​) dataframe for the positions ⌨️ (2:32:47​) get the sales id for position objects ⌨️ (2:38:00​) the apply function ⌨️ (2:49:01​) merge dataframes ⌨️ (2:54:57​) perform groupby ⌨️ (2:58:12​) working on the charts part 1 ⌨️ (3:02:58​) working on the charts part 2 ⌨️ (3:17:18​) hello world from the console ⌨️ (3:21:29​) adding the modal ⌨️ (3:29:04​) add the report form to the modal ⌨️ (3:35:45​) add the 'results by' field ⌨️ (3:50:02​) no data available alert ⌨️ (3:53:51​) add the chart to the modal ⌨️ (3:58:48​) create report objects ⌨️ (4:28:46​) adding alerts to the modal ⌨️ (4:33:27​) report list and detail page ⌨️ (4:41:35​) working on the report list ⌨️ (4:47:43​) working on the report detail ⌨️ (4:51:33​) first pdf ⌨️ (4:58:13​) the report pdf ⌨️ (5:04:19​) add dropzone + favicon ⌨️ (5:07:30​) working on the dropzone js part 1 ⌨️ (5:17:01​) working on the dropzone js part 2 ⌨️ (5:23:52​) uploading csvs ⌨️ (5:35:45​) first objects from file ⌨️ (5:49:27​) improving the dropzone ⌨️ (5:56:15​) dropzone js final touches ⌨️ (6:04:03​) adding my profile ⌨️ (6:09:42​) working on my profile ⌨️ (6:17:06​) authentication ⌨️ (6:31:14​) protecting the views ⌨️ (6:36:17​) adding the navbar ⌨️ (6:49:03​) the forgotten sale detail page ⌨️ (6:57:06​) outro + next steps 🎉 Thanks to our Champion supporters: 👾 Otis Morgan 👾 DeezMaster 👾 Katia Moran -- Learn to code for free and get a developer job: https://www.freecodecamp.org Read hundreds of articles on programming: https://freecodecamp.org/news And subscribe for new videos on technology every day: https://youtube.com/subscription_center?add_user=freecodecamp

Watch Online Full Course: Django 3 Course - Python Web Framework (+ pandas, matplotlib, & more)


Click Here to watch on Youtube: Django 3 Course - Python Web Framework (+ pandas, matplotlib, & more)


This video is first published on youtube via freecodecamp. If Video does not appear here, you can watch this on Youtube always.


Udemy Django 3 Course - Python Web Framework (+ pandas, matplotlib, & more) courses free download, Plurasight Django 3 Course - Python Web Framework (+ pandas, matplotlib, & more) courses free download, Linda Django 3 Course - Python Web Framework (+ pandas, matplotlib, & more) courses free download, Coursera Django 3 Course - Python Web Framework (+ pandas, matplotlib, & more) course download free, Brad Hussey udemy course free, free programming full course download, full course with project files, Download full project free, College major project download, CS major project idea, EC major project idea, clone projects download free

Show dotnet: Build your own unit test platform? The true story of .NET nanoFramework.

Hi! I’m Laurent Ellerbach. I’m a Principal Software Engineer Manager at Microsoft working for the Commercial Software Engineering team. My team and I are doing co-engineering with our largest customers helping them in their digital transformation and focussing on Azure. I’m more focussing on Manufacturing industry and I’ve been involved in IoT for a very long time. I’ve been a contributor to .NET IoT and quickly became one of the main contributors which drove me to work very closely with the .NET team. As a fan of C# since day 1, I’m always looking at fun and innovative way to use it as much as I can. I was excited to discover .NET nanoFramework and I’m working on bridging both .NET IoT and .NET nanoFramework to make it easier for a C# developer to use one or the other and reuse as much code as possible.

I’d like to show dotnet how we built a test framework for .NET nanoFramework. .NET nanoFramework is an implementation of .NET that runs directly on very low-end microcontrollers like ESP32, ARM Cortex-M cores based like STM32, TI CC13x2 and some of the NXP family. It brings all the power of C# and .NET to write embedded code directly on those small footprint devices.

.NET nanoFramework is Open Source and can be found on GitHub. .NET nanoFramework is community driven mainly sponsored by individuals, Eclo Solutions, Global Control 5 and OrgPal.IoT. .NET nanoFramework is part of the .NET Foundation. It is a spin-off of .NET Microframework, with a lot of rewrite, and a lot of evolution over time. And with time, with changes, the Test framework which was present in .NET Microframework stopped working and being compatible with nanoFramework. The test framework of .NET Microframework was an internal implementation, it is different from a unit test framework as we know it.

This article will guide you on what it takes to build a unit test environment on a platform that does not have any. We will see that the .NET runtime nanoFramework is running is not the same as .NET Framework or .NET Core. It is also extremely constrained. If you’re interested to understand what someone must develop for your unit test to be magic when you press the run button, this article is for you.

First, I want to highlight that nothing would have been possible without José Simões, CEO at Eclo Solutions, founder of .NET nanoFramework. He has been working on and maintaining the .NET nanoFramework for years and helped me to create this unit test platform. He was recently awarded as Microsoft Most Valuable Professional (MVP), presumably in gratitude for all his efforts for .NET for embedded application scenarios.

As developers, we all love unit tests. They are a great way to increase the code quality, making sure that once you change something in the code, you won’t break anything. They are the foundation of any modern software development. So, .NET nanoFramework needed support for unit testing!

What you want from unit tests is that they can run automatically, integrated in your IDE, run in a build pipeline, provide your code coverage, be easy to implement, and be able to do test driven development. In the case of hardware development, they should run on a real device and report the results properly. You might want them to make you a good coffee but I’m not sure this will happen 😊.

We tend to take it as granted that someone must build the support for a new language or platform to run unit tests. This applies especially in the .NET world where there is a large choice with for example tools like xUnit, NUnit, Coverlet and more.

So let’s see what is required to build your own unit test platform by looking at was done with.NET nanoFramework.

.NET nanoFramework architecture

First, I will give you an introduction to the .NET nanoFramework architecture. This is .NET C# running directly on the metal on small chips like ESP32. When I write small, think of 520 Kb SRAM, 240 MHz clock processor, few Mb of flash memory. And that’s for everything: the code, the memory allocation, everything.

.NET nanoFramework embeds a nano CLR for each supported hardware which will interpret and execute your .NET compiled code. You will find class libraries too, like System.Text. As you may guess, the libraries are minimal versions when compared with the ones that you can find in .NET 5. Minimal meaning that a subset of the full API is available, only the most common ones, fewer overloaded methods and constructors. There are additional class libraries to provide access to GPIO, SPI, I2C. The APIs for these protocols are very similar to the ones defined and offered by .NET IoT, which helps developers reuse code from .NET 5, for example, to .NET nanoFramework.

As a developer, you have the full development experience that you are used to with Visual Studio 2019 thru a .NET nanoFramework extension you’ll have to install to support the specific project system, the build, debug and deploy onto the devices.

nanoFramework architecture

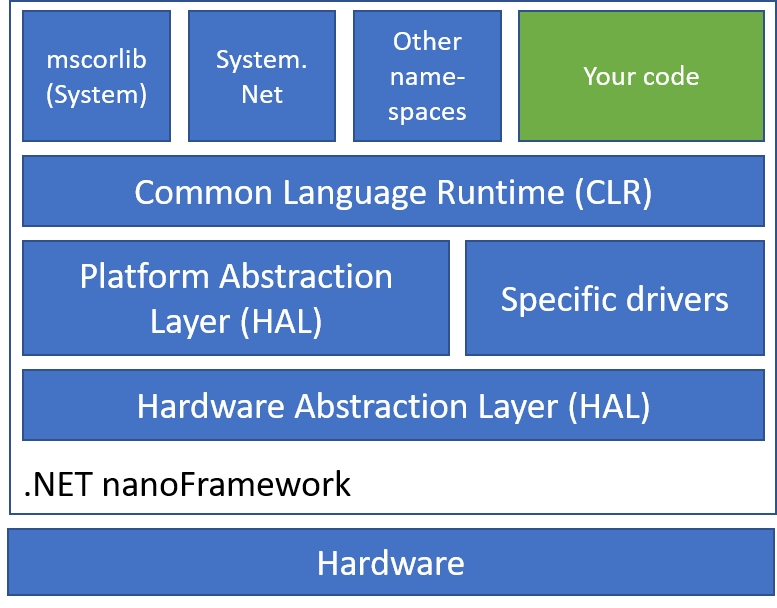
There is no real OS per se on those small processors, just a Real Time OS (RTOS) for threading and basic elements like Azure RTOS. Every chip maker is free to choose the RTOS they are supporting and .NET nanoFramework supports a large variety of them.

Each specific platform is based on a native C SDK from Espressif, STM, NXP, or TI for example. Those SDKs are represented in the architecture as Hardware Abstraction Layer. Then a second layer called Platform Abstraction Layer, as well fully written in C allows to make a standard API for the nano CLR while connecting with every specific HAL SDK.

Most of the platforms have to be flashed with a specific boot loader and also the lower layers including the nano CLR, HAL, PAL and potential specific drivers. Some of the platforms already have their own bootloader, so this is not a mandatory component.

The rest of the upper layers where the classic assemblies classes stands, including mscorlib are C# assemblies and can be flashed thru Visual Studio by just pressing F5 to run your application. It’s important to add that there is a native interop possibility with C/C++ component. The native part will have to be deployed like the rest of the C code. The native code exposes the functions to your C# code.

To build the C# code, the normal build chain for .NET C# is used producing a DLL/EXE and PDB files that are similar to a .NET 5 C# build. The PDB file contains the debug information. Then a post build operation is done to transform the DLL/EXE into a light portable executable (PE) file and the PDB file to a PDBX file. This PE file is the one uploaded to the device and executed. You can of course load multiple PE files, typical example would be an executable and the dependent libraries, including mscorlib. This is important to keep in mind, we will understand why later.

The experience you have as a developer when running the code and debugging on the device is the same as for any .NET application. You can set breakpoint, get the variable data, step in, set the next statement.

nanoFramework Visual Studio Extension with debug

The problems to solve for a proper unit test platform

Back to what we want as a developer to run our tests, there are quite some problems to solve for .NET nanoFramework:

  • How to run tests where you need to discover the code in nano?
  • How to run tests on a Windows machine?
  • How to run tests on a real device?
  • How to have functions you can call before and after the test? Typically to setup hardware properly.
  • How to run the test both on the Windows machine and on the hardware the exact same way?
  • How to integrate all this with Visual Studio 2019?
  • How to run tests in a pipeline for Quality Assurance?
  • How to have proper test code coverage?
  • How to make it as simple as creating a xUnit Test project in Visual Studio?

The Test Framework

While those problems are generic, applied to .NET nanoFramework, we can look at what was available as building blocks to use.

The first one is the fact that .NET nanoFramework has some System.Reflection capabilities with support for simple attributes. So the familiar [Fact] and other method decoration could be used as a mechanism to recognize which methods contains tests.

There is a support of course for Exception and Exception handling, so the familiar Assert functions can be used as well. So putting all together, the model of having a void function that will run the test and raises an exception if there is an unexpected result will work.

To handle the fact that some methods need to be run at setup and to clean the device at the end can be handled with specific attributes.

We can have the following example when everything is put together for this part of the solving how the Test Framework will look like:

using nanoFramework.TestFramework;
using System;
using System.Diagnostics;

namespace NFUnitTest1
{
    [TestClass]
    public class Test1
    {
        static private int _global = 0;
        static private int[] _array;

        [TestMethod]
        public void TestMethod1()
        {
            Assert.NotEqual(0, _global);
            Assert.Equal(_array[0], 1);
            Assert.Throws(typeof(ArgumentNullException), () =>
            {
                Debug.WriteLine("Throwing a ArgumentNullException");
                throw new ArgumentNullException();
            });
            string str = "nanoFramework Rocks!";
            Assert.StartsWith("nano", str);
        }

        [TestMethod]
        public void AnotherTest()
        {
            Assert.True(false, "This is on purpose");
        }

        [Setup]
        public void SetupTest()
        {
            _global = 42;
            _array = new int[3] { 1, 4, 9 };
            Assert.Equal(42, _global);
        }

        [Cleanup]
        public void LetsClean()
        {
            Assert.NotEmpty(_array);
            _array = null;
            Assert.Null(_array);
        }
    }
}

We will reuse this example later and see how to run this on the Windows development machine or on a device, gather the results, display them in Visual Studio 2019 and have code coverage information.

The unit test launcher

The key question now is to find a way to launch those tests. For this part, we will use the reflection present in .NET nanoFramework and catch all possible exceptions to check if a test pass or fail.

The core part of the launcher looks like this:

Assembly test = Assembly.Load("NFUnitTest");

Type[] allTypes = test.GetTypes();

foreach (var type in allTypes)
{
    if (type.IsClass)
    {
        var typeAttribs = type.GetCustomAttributes(true);
        foreach (var typeAttrib in typeAttribs)
        {
            if (typeof(TestClassAttribute) == typeAttrib.GetType())
            {
                var methods = type.GetMethods();
                // First we look at Setup
                RunTest(methods, typeof(SetupAttribute));
                // then we run the tests
                RunTest(methods, typeof(TestMethodAttribute));
                // last we handle Cleanup
                RunTest(methods, typeof(CleanupAttribute));
            }
        }
    }
}

private static void RunTest(
    MethodInfo[] methods,
    Type attribToRun)
{
    long dt;
    long totalTicks;

    foreach (var method in methods)
    {
        var attribs = method.GetCustomAttributes(true);

        foreach (var attrib in attribs)
        {
            if (attribToRun == attrib.GetType())
            {
                try
                {
                    dt = DateTime.UtcNow.Ticks;
                    method.Invoke(null, null);
                    totalTicks = DateTime.UtcNow.Ticks - dt;

                    Debug.WriteLine($"Test passed: {method.Name}, {totalTicks}");
                }
                catch (Exception ex)
                {
                    Debug.WriteLine($"Test failed: {method.Name}, {ex.Message}");
                }

            }
        }
    }
}

In short, the launcher loads an assembly that has to be called NFUnitTest then find all the test classes, all the test methods and runs all of them. First all the Setup ones, then the TestMethod ones and finally the Cleanup ones. So far, the choice has been made to impose the NFUnitTest as the assembly name that will contain the tests. The reflection present in .NET nanoFramework does not allow yet to find all the possible assemblies and try them all. There also isn’t the possibility to pass some command line arguments to the main function. Those are elements that we are looking into implementing in the future.

While loading the NFUnitTest assembly, all the needed dependent assemblies are loaded as well by the nano CLR. So the tests can cover as many dependencies as you’d like and can load on the device. We’ll see later about the challenge of finding them and uploading on the device or running them on a regular Windows machine.

Debug.WriteLine is used to output the results of the tests. It is a fairly simple way and comes with few challenges: we’ll need to make sure we can gather the output from the device. As a challenge, an optimization is done while building .NET in Release mode, all the Debug.* are purely removed from the build. Same behavior applies to .NET nanoFramework as the tool chain used is the same. So this specific component must be always compiled and distributed as a Debug version to make sure the Debug.* will always be available. The other challenge is on the parsing side, gathering the right information, making sure that the rest of the content is not using this pattern.

Second and more complicated part is to be able to collect this output from the device and on a Windows machine. The good news here is that there is this mechanism already in place distributed with the .NET nanoFramework extension for Visual Studio 2019.

nanoCLR Win32 application

While I’ve explained that there is a mechanism to upload and run code, gather the debug information on a device, I did not yet explain how to run .NET nanoFramework on a Windows machine. The assemblies can’t just be loaded even in a different application domain and run. That will fail because .NET nanoFramework has its own Base Class Library and CLR, not to mention a HAL and PAL.

Similarly with what happens for any of the hardware platforms we support, we have a build for Windows 32. It includes a CLR, the BCL, and other namespaces. The assembly loading mechanism is slightly different from the one that runs on an microcontroller, but, apart from that, all the rest is the exact same code. The Windows build is an executable that accepts parameters from the command line, like any typical console application, and that’s how the assemblies are loaded.

This makes it very convenient to use in scenarios like running unit tests, use on Azure DevOps pipeline and similar ones.

Visual Studio Adapter Extensibility

Visual Studio Test offers extensibility to discover, run the tests and gather the results in Visual Studio through the Adapter Extensibility. It can also be used from the command line or in a pipeline with the vstest.console.exe executable.

Looking at the target architecture and summarizing what we’ve seen before, we now have the following:

nanoFramework unit test architecture

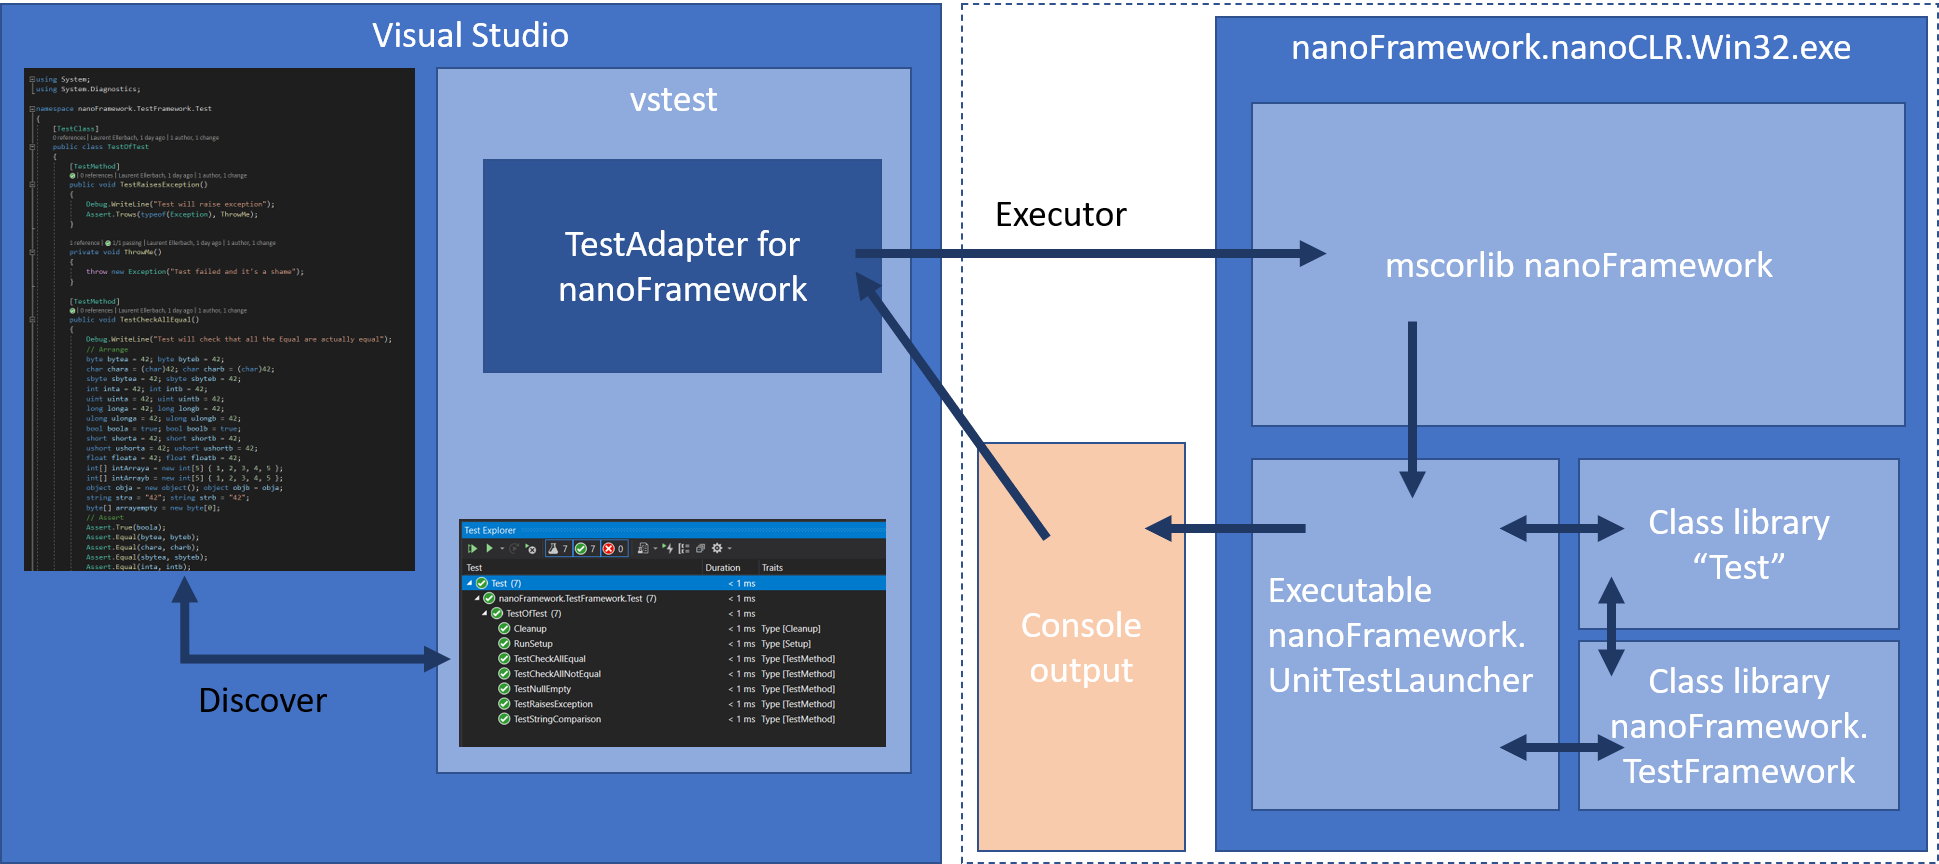
On the right, the nanoCLR Win32 application that is loaded with the unit test launcher, the Test Framework and of course the assemblies to test. The output goes into the console.

The TestAdapter should then be able to gather the output coming from the execution of the Test assembly and processes it. Before this, the first challenge is to discover the tests. Let’s look at how this is done.

Test Discovery

The ITestDiscover interface has one method DiscoverTests which obviously is here to discover the tests. As you can remember from the .NET nanoFramework architecture, the C# code is compiled through the normal build pipeline producing a DLL/EXE and PDB file.

public static List<TestCase> FindTestCases(string source)
{
    List<TestCase> testCases = new List<TestCase>();

    var nfprojSources = FindNfprojSources(source);
    if (nfprojSources.Length == 0)
    {
        return testCases;
    }

    var allCsFils = GetAllCsFileNames(nfprojSources);

    Assembly test = Assembly.LoadFile(source);
    AppDomain.CurrentDomain.AssemblyResolve += App_AssemblyResolve;
    AppDomain.CurrentDomain.Load(test.GetName());

    Type[] allTypes = test.GetTypes();
    foreach (var type in allTypes)
    {
        if (type.IsClass)
        {
            var typeAttribs = type.GetCustomAttributes(true);
            foreach (var typeAttrib in typeAttribs)
            {
                if (typeof(TestClassAttribute).FullName == typeAttrib.GetType().FullName)
                {
                    var methods = type.GetMethods();
                    // First we look at Setup
                    foreach (var method in methods)
                    {
                        var attribs = method.GetCustomAttributes(true);

                        foreach (var attrib in attribs)
                        {
                            if (attrib.GetType().FullName == typeof(SetupAttribute).FullName ||
                            attrib.GetType().FullName == typeof(TestMethodAttribute).FullName ||
                            attrib.GetType().FullName == typeof(CleanupAttribute).FullName)
                            {
                                var testCase = GetFileNameAndLineNumber(allCsFils, type, method);
                                testCase.Source = source;
                                testCase.ExecutorUri = new Uri(TestsConstants.NanoExecutor);
                                testCase.FullyQualifiedName = $"{type.FullName}.{testCase.DisplayName}";
                                testCase.Traits.Add(new Trait("Type", attrib.GetType().Name.Replace("Attribute","")));
                                testCases.Add(testCase);
                            }
                        }
                    }

                }
            }
        }
    }

    return testCases;
}
private static Assembly App_AssemblyResolve(object sender, ResolveEventArgs args)
{
    string dllName = args.Name.Split(new[] { ',' })[0] + ".dll";
    string path = Path.GetDirectoryName(args.RequestingAssembly.Location);
    return Assembly.LoadFrom(Path.Combine(path, dllName));
}

To make it easier to process at first, there are few conventions we’ll have to follow for the tests project. All the .NET nanoFramework projects are nfproj files, not csproj file. The reason is because of lack of Target Framework Moniker (TFM). The second convention used is that the binRelease or binDebug directories has to be child of those nfproj files.

The discovery happens with source files passed to the Test Adapter as full path names. To identify a .NET nanoFramework project, a nfproj file is searched in the directory tree and all the associated cs files are searched. Those conventions simplify the search process.

Now, despite of .NET nanoFramework has its own mscorlib, it’s still a .NET assembly, therefore we can apply some of the .NET magic: using reflection on the nanoFramework assemblies to discover potential tests!

Because mscorlib version is different than the one running in the main code, we have to first creating an Application Domain, loading the assembly and its dependencies. And here, there is another trick that’s most convenient for what we are trying to accomplish: when building a .NET nanoFramework assembly, all its dependencies get into the build folder. Loading the dependencies, it’s a simple matter of just loading every assembly that’s present in this folder. That does simplify a lot the process.

Once you have the assembly loaded, you can use reflection and find out all the possible methods through the test attributes.

At this stage it’s a bit tricky as well to find the line numbers for each specific test. As per the previous convention, all the CS files are part of a sub directory and as for some of the other .NET tests framework, a file parsing is done to find the correct line number. This is a compromise needed as we cannot really execute the .NET nanoFramework code into the Application Domain. That will fail because of the lack of HAL and PAL.

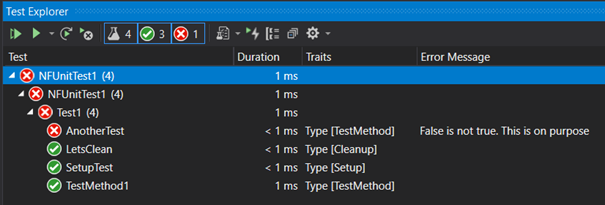
The list of tests can be passed back to Visual Studio. And taking our previous example, we will have this into the Test Explorer window:

nanoFramework test discovery

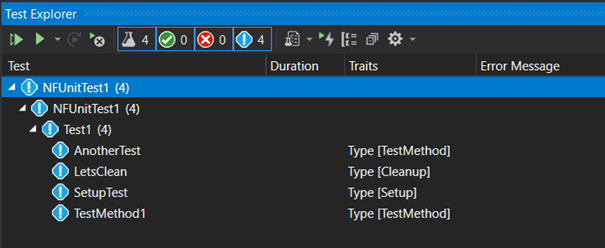
Traits are used to identify the type of test methods and making it easy to find the Setup, Cleanup ones.

Test Executor

The ITestExecutor interface is the one thru which the tests are run and the results output. The tests can be launched thru Visual Studio or from the command line tool. When launched thru the command line, the discovery has to happen first. When ran through Visual Studio 2019, only the tests’ part needs to run, the discovery is done through the Adapter Extensibility.

The complexity here is multiple and different of the tests are to be run on the device or in the nanoCLR Win32 application. In any of these cases, finding all the PE files and loading them it’s not much of a challenge as they are all in the same directory. But wait, here is something important: you can’t run nanoCLR on a HAL/PAL that is not designed for it. The reason is that the calls between the C# code and their native counterparts have to match otherwise bad things will happen. Remember, the C# “connected” to C code through that interop layer. Changing one of the function signatures and the call to its counterpart will fail or produce unexpected results. It’s then important to check those specific versions especially for the hardware. But we’ve decided to make an exception (to a certain extent) for the nanoCLR Win32 application. And you’ll understand why when reading about the chicken and egg part ahead in this post.

The specific challenge with the nanoCLR Win32 is to find the application and being able to always load the latest version to make sure we’re always running on the latest HAL/PAL. You’ll understand the general distribution mechanism when reading the NuGet section. The NuGet package provides the unit test launcher, the test framework, and a version of the nanoCLR Win32.

The mechanism used is based on the possibility, as we’re using the same build chain as any other .NET C# code, to have specific targets. You will find the targets file in the repository. While building the system will check if the latest version is present and install it if needed.

While it will be too long to explain in detail all the mechanism in place to upload the code on the device, run it and gather the results thru the debug channel, from the code, the steps are the following: discover the device, the debug and the connection to a device is done by serial port.

Each device is flashed with a boot loader and the nanoCLR. They respond to a “ping” packet. Once a device is queried and responds properly, it’s safe to assume that we have a valid .NET nanoFramework device at the other end and that it’s running the debugger engine. The next step is to erase the deployment area of the device memory and check that the device is back to its initialized state.

Once this state is reached, we check the versions of all the assemblies and the compatibility with the device. This is done by decompiling the DLL/EXE and checking the version. One more time, we’re using the trick that .NET nanoFramework is real .NET code and being built with the normal build chain.

foreach (string assemblyPath in allPeFiles)
{
    // load assembly in order to get the versions
    var file = Path.Combine(workingDirectory, assemblyPath.Replace(".pe", ".dll"));
    if (!File.Exists(file))
    {
        // Check with an exe
        file = Path.Combine(workingDirectory, assemblyPath.Replace(".pe", ".exe"));
    }

    var decompiler = new CSharpDecompiler(file, decompilerSettings); ;
    var assemblyProperties = decompiler.DecompileModuleAndAssemblyAttributesToString();
    // read attributes using a Regex
    // AssemblyVersion
    string pattern = @"(?<=AssemblyVersion("")(.*)(?="")])";
    var match = Regex.Matches(assemblyProperties, pattern, RegexOptions.IgnoreCase);
    string assemblyVersion = match[0].Value;
    // AssemblyNativeVersion
    pattern = @"(?<=AssemblyNativeVersion("")(.*)(?="")])";
    match = Regex.Matches(assemblyProperties, pattern, RegexOptions.IgnoreCase);
    // only class libs have this attribute, therefore sanity check is required
    string nativeVersion = "";
    if (match.Count == 1)
    {
        nativeVersion = match[0].Value;
    }
    assemblyList.Add(new DeploymentAssembly(Path.Combine(workingDirectory, assemblyPath), assemblyVersion, nativeVersion));
}

The next step is to load the assemblies into the device and launch the debug process. This will automatically find the unit test launcher which will start the mechanism. What’s left is to gather the output from the debug engine for a further analyze:

device.DebugEngine.OnMessage += (message, text) =>
{
    _logger.LogMessage(text, Settings.LoggingLevel.Verbose);
    output.Append(text);
    if (text.Contains(Done))
    {
        isFinished = true;
    }
};

On the nanoCLR Win32 side, the executable must be found in the various paths as per the previous description, and the build will ensure that the latest versions are installed. All the assemblies must be loaded as arguments in the command line. Now, as this is an external process, a Process class is used capture the Output and Error streams coming from the nanoCLR executable.

private Process _nanoClr;
_nanoClr = new Process();
_nanoClr.StartInfo = new ProcessStartInfo(nanoClrLocation, parameter)
{
    WorkingDirectory = workingDirectory,
    UseShellExecute = false,
    RedirectStandardError = true,
    RedirectStandardOutput = true
};
_nanoClr.OutputDataReceived += (sender, e) =>
{
    if (e.Data == null)
    {
        outputWaitHandle.Set();
    }
    else
    {
        output.AppendLine(e.Data);
    }
};

_nanoClr.ErrorDataReceived += (sender, e) =>
{
    if (e.Data == null)
    {
        errorWaitHandle.Set();
    }
    else
    {
        error.AppendLine(e.Data);
    }
};

_nanoClr.Start();

_nanoClr.BeginOutputReadLine();
_nanoClr.BeginErrorReadLine();
// wait for exit, no worries about the outcome
_nanoClr.WaitForExit(runTimeout);

The code is what you need to create, capture the output and start the process. Pay attention to the WaitForExit method that will wait for the process to exit or will kill the process after a timeout occurs. This is something important to keep in mind and we’ll discuss this part when looking into the .runsettings section.

In both cases, once the test run completes, the output string needs to be parsed. The parser will extract the “Test passed:”, “Test failed:” messages, the method names, the time and any Exception present there, along with anything that has been output in the debug section to make it very developer friendly.

Once you’ll press the play button from the Test Explorer window, you’ll quickly get the test results from our test case:

nanoFramework test failed

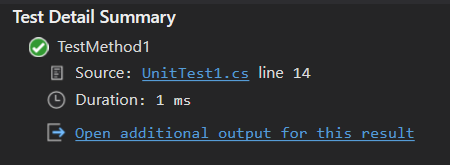
For each test case, you’ll get the detail view:
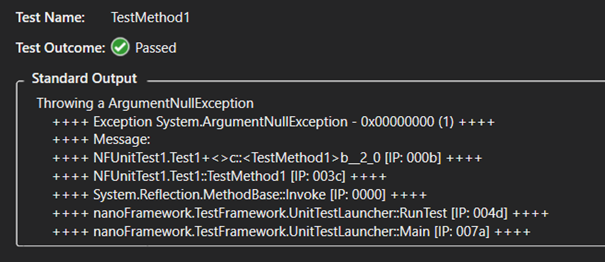
nanoFramework test details

And the details:

nanoFramework test details results

And of course, as you may expect the annotation into the code for the passed and missed tests. You’ll get this for all the classes you have tests in for all the sources that Visual Studio will discover following the code path.

nanoFramework test code coverage

.runsettings files

A nice mechanism as well is the .runsettings file that can be used to pass specific settings to the Test Adapter. The file looks like that in our case:

<?xml version="1.0" encoding="utf-8"?>
<RunSettings>
   <!-- Configurations that affect the Test Framework -->
   <RunConfiguration>
       <MaxCpuCount>1</MaxCpuCount>
       <ResultsDirectory>.TestResults</ResultsDirectory><!-- Path relative to solution directory -->
       <TestSessionTimeout>120000</TestSessionTimeout><!-- Milliseconds -->
       <TargetFrameworkVersion>Framework40</TargetFrameworkVersion>
   </RunConfiguration>
   <nanoFrameworkAdapter>
       <Logging>None</Logging>
       <IsRealHardware>False</IsRealHardware>
   </nanoFrameworkAdapter>
</RunSettings>

There are few tricks in this file. First the target framework version is set to Framework40. As this build tool chain is used to build the nanoFramework code, this will trigger the discovery from Visual Studio.

Second trick is the session timeout, some tests like some threading tests we’re running can be long and you can then play with this setting to avoid having your tests stopped. It’s also the mechanism used to make the test execution to stop internally.

The nanoFrameworkAdapter section contains the specific settings that can be passed to the Test Adapter. This is where you can adjust the IsRealHardware from False to True to run it from the Win32 CLR or on a real device. That’s the only thing you need to change. Pressing F5 or running it in a command line or in a pipeline will be the exact same process and in full transparency from with the Win32 CLR or the real device.

This .runsettings needs to be present in the same directory as the nfproj file by convention so Visual Studio 2019 will find it and the test discovery can be processed automatically.

For a command line usage or a pipeline usage, the file can be anywhere, it has to be passed as an argument.

Running the test in Azure DevOps pipeline

As part of each PR like in almost all serious projects nowadays, there are QA checks in place. .NET nanoFramework is using Azure DevOps and running the tests is as simple as adding a Task in Azure Pipline yaml. You can see a result example from the mscorlib build here. You will notice that there are 43 failed tests. The reason is once the unit test framework has been put in place more than 2000 tests have been migrated from .NET Microframework. This process has brought along with the unit tests, opportunities to uncover edge cases and bugs introduced over time. As soon as those will be fixed and all tests are passing, a failure in the unit test task will prevent the merge therefore acting as a quality gate.

The Azure DevOps task looks like this:

- task: VSTest@2
  condition: and( succeeded(), $, ne( variables['StartReleaseCandidate'], true ) )
  displayName: 'Running Unit Tests'
  continueOnError: true
  inputs:
    testSelector: 'testAssemblies'
    testAssemblyVer2: |
      ***NFUnitTest*.dll
      ***Tests*.dll
      ***Tests*.dll
      !***TestAdapter*.dll
      !***TestFramework*.dll
      !**obj**
    searchFolder: '$(System.DefaultWorkingDirectory)'
    platform: '$(BuildPlatform)'
    configuration: '$(BuildConfiguration)'
    diagnosticsEnabled: true
    vsTestVersion: toolsInstaller
    codeCoverageEnabled: true
    runSettingsFile: '$'

This is a very standard build task using VS Test which will run vstest.console.exe. The parameters are path to the different configuration elements including the .runsettings as explained in the previous part.

The result is a TRX file: Results File: D:a_temp.TestResultsTestResultsVssAdministrator_WIN-C3AUQ572MAF_2021-03-10_13_06_15.trx and the task passing or failing.

This TRX file can be used to push the results into the Azure DevOps board for example, or any other platform like SonarCloud used by .NET nanoFramework for static code analysis.

NuGet: the friendly developer way

We have now seen the full chain and all the components that are needed, along with some of the mechanisms behind all this that make all this working. Now, we don’t want to ask developers to clone a project to have the test. The core idea, since the beginning and related to what we want as developers is to be able to use it smoothly and that’s fully transparent. So, for this purpose, a NuGet package is provided. This package includes the unit test launcher (build in Debug version), the test framework library (build in Release), the nanoCLR Win32 application and the update mechanism for the nanoCLR Win32.

Visual Studio project template

Now to make it absolutely simple for the developer, once you have the .NET nanoFramework Visual Studio 2019 Extension installed, you can create a blank Unit Test project for .NET nanoFramework by using the respective project template.

nanoFramework create unit test project

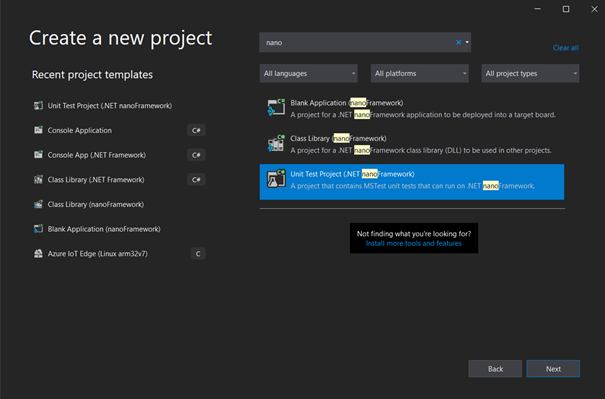
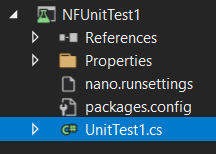
Like with any project template that we are used to, it will automatically create the right type of project, add the NuGet, put the .runsettings file in place and set the correct assembly name.

nanoFramework project files

And you’re good to go to go to write your .NET nanoFramework tests.

The chicken and egg problem

As we’ve mentioned before, .NET nanoFramework has it’s own Base Class Library, or mscorlib and friends. One of the motivations to create all the unit test framework for .NET nanoFramework was to be able to reuse, adapt and add tests. Once the framework was in place, the migration of 2000+ tests from .NET Microframework happened. This work represented 84K lines of codes added to mscorlib. It helped to discover quite some edge cases and fixing all of them is now in process.

But why is this a chicken and egg problem? Well, looking at what I wrote previously, the Unit Test Platform is distributed through a NuGet package. This package includes the Unit Test Launcher and the Test Framework which, for obvious reasons are built against a specific version of mscorlib.

Now, when you want to run the mscorlib Unit Tests, you want them to run on the version it’s building at that time, not against a previous version. It does mean that all the elements must be as project reference. The tests should be project reference of mscorlib, the Unit Test Launcher and the Test Framework as well. Because .NET nanoFramework is organized in different repositories, the Test Framework one is and this make it easy to add it as a git sub module of the mscorlib one.

As this still requires a specific version of nanoCLR Win32, a fake test project has been added, which contains the NuGet package and as it is built, the latest version of the nanoCLR Win32 is pulled from the build. As mscorlib is using a native C implementation as well, that does allow to run the tests with the always up to date version, all built from source, including in the Azure DevOps pipelines.

What’s next

Now that this .NET nanoFramework unit test framework is real and fully usable. Even if as explained at the beginning, .NET Microframework have a specific test platform, the code used to run those tests can be migrated in large part and adapted to run for nanoFramework. Those test cases will be migrated to the respective class libraries where they belong to. The idea is to have a decent 80%+ coverage for all the .NET nanoFramework code.

Right now the challenge is to be able to have a proper code coverage report. Tools like Coverlet can’t be used for the reasons mentioned before about the execution stack and dependencies built. .NET nanoFramework mscorlib is not properly loaded in any of those tools including the VS Test code coverage. This will require more work and a PE parser to analyze more deeply the execution path. There are options for this, one of them being the metadata processor tool, which is used today to parse the assemblies generated by Roslyn and produce the PE files that are loaded into nanoCLR. The code coverage will be part of the Test Adapter rather than the DataCollector VS Test extension. The reason is because it is hard to separate the tests from the analysis of the execution itself.

Where to start .NET nanoFramework?

To start with .NET nanoFramework, the first step is to get one of the supported devices like an ESP32. There is a list of board reference and community supported boards. Then you have to follow the step by step guide to install the Visual Studio 2019 extension, flash your device, create your first project and run it.

Having your own C# .NET code running on one of those embedded devices is a matter of minutes and very straight forward.

To create a unit test project, the steps are explained in this post, it’s a matter of selecting the type of unit test project for nanoFramework, write a few lines and you’ll be good to go! You don’t even need a real device to start playing with the unit test framework.

If any help needed, the .NET nanoFramework community is very active and is using Discord channels. Contribution to improve .NET nanoFramework on the native C, the C# and documentation side are more than welcome. The main .NET nanoFramework page will give you all the links you need.

I hope you’ve enjoyed this article, please let me know if you want more like this! Take care.

The post Show dotnet: Build your own unit test platform? The true story of .NET nanoFramework. appeared first on .NET Blog.


source https://devblogs.microsoft.com/dotnet/show-dotnet-build-your-own-unit-test-platform-the-true-story-of-net-nanoframework/

Share this post

Search This Blog

What's New

The "AI is going to replace devs" hype is over – 22-year dev veteran Jason Lengstorf [Podcast #201]

Image
Curriculum for the course The "AI is going to replace devs" hype is over – 22-year dev veteran Jason Lengstorf [Podcast #201] Today Quincy Larson interviews Jason Lengstorf. He's a college dropout who taught himself programming while building websites for his emo band. 22 years later he's worked as a developer at IBM, Netlify, run his own dev consultancy, and he now runs CodeTV making reality TV shows for developers. We talk about: - How many CEOs over-estimated the impact of AI coding tools and laid off too many devs, whom they're now trying to rehire - Why the developer job market has already rebounded a bit, but will never be the same - Tips for how to land roles in the post-LLM résumé spam job search era - How devs are working to rebuild the fabric of the community through in-person community events Support for this podcast is provided by a grant from AlgoMonster. AlgoMonster is a platform that teaches data structure and algorithm patterns in a structure...

Labels

Programming Video Tutorials Coursera Video Tutorials Plurasight Programming Tutorials Udemy Tutorial C# Microsoft .Net Dot Net Udemy Tutorial, Plurasight Programming Tutorials, Coursera Video Tutorials, Programming Video Tutorials Asp.Net Core Asp.Net Programming AWS Azure GCP How To WordPress Migration C sharp AWS Project Git Commands FREE AWS Tutorial OldNewThings Git Tutorial Azure vs AWS vs GCP New in .Net javascript AI Google I/O 2025 Wordpress jquery Generative Video Git Git Squash Google Flow AI PHP SQL Veo 3 squash commit CSS Cloud Services React Tutorial With Live Project Source Code git rebase CPR Nummer Dropdown Reset Javascript Figma Figma Beginner Tutorial Geolocation Non-Programmer Content Python Free Course Think Simply Awesome Tutorial UI UX Live Project UI/UX Full Course Wireframing dotnet core runtime error html API Gateway AWS EKS vs Azure AKS All in one WP stuck C++ C++ Coroutines CPR Denmark ChatGPT Cloud Database Cloud DevOps Cloud Security Cloud Storage Contact Form 7 Dropdown Unselect Javascript E commerce Free AWS Terraform Project Training Git Commit Google Drive Files Google Drive Tips Http Error 500.30 Http Error 500.31 Interview Questions Learn Courutines C++ Microservices for Live Streaming PII Denmark Pub Sub SQL Server SSIS Terraform Course Free Terraform Tutorial Free USA E commerce strategies UpdraftPlus UpdraftPlus Manual Restore Website Optimization Strategies dropdown javascript select drop down javascript smarttube apk error 403 smarttube next 403 Error 413 Error 503 504 524 AI & ML AI Assistants AI Course CS50 AI in daily life AWS API Gateway AWS EBS AWS EC2 vs Azure VMs vs GCP Compute Engine AWS EFS AWS IAM AWS Lamda AWS RDS vs Azure SQL AWS Redshift AWS S3 AZ-104 AZ-104 Free Course AZ-104 Full Course AZ-104 Pass the exam Abstract Class C# Abstract Method Ajax Calender Control Ajax Control Toolkit All In One Extension Compatibility All In One WP Freeze All In One WP Migration All in one WP All-in-One WP Migration Android 15 Android TV Applying Theme html Asp.net core runtime Error Audio Auto Complete Azure AD Azure APIM Azure Administrator Certification Azure Blob Storage Azure Data Lake Azure Files Azure Function Azure Managed Disk Azure Synapse Base Class Child Class Best Grocery Price Big Data BigBasket vs Grofers Bing Homepage Quiz Blogger Import Blogger Post Import Blogger XML Import Bluetooth Connectivity Browser Detail Building Real-Time Web Applications Bulk Insert CI/CD CPR Address Update CPR Generator CPR Generator Denmark CS50 AI Course CS50 AI Python Course CS50 Artificial Intelligence Full Course CVR Centrale Virksomhedsregister Change Workspace TFS ChatGPT Essay Guide ChatGPT Usage ChatGPT vs Humans Cloud API Management Cloud CDN Cloud Computing Cloud Data Warehouse Cloud Event Streaming Cloud IAM Cloud Messaging Queue Cloud Monitoring and Logging Cloud Networking CloudFront Cloudflare Cloudwatch Compute Services Connect a Bluetooth Device to my PC site:microsoft.com Containers ControlService FAILED 1062 Corona Lockdown MP CosmosDB Covid19 Covid19 Bhopal Covid19 Home Delivery MP Covid19 Indore Covid19 Susner Covid19 Ujjain Cypress Javascript Cypress Javascript framework Cypress Javascript testing Cypress Javascript tutorial Cypress Javascript vs typescript DNS Danish CVR Data Analytics Data Analytics Course Free Data Engineering Data Structure Full Course Data Visualization Database Database Diagram Visualizer Davek Na Dodano Vrednost Dbdiagram export seeder Deep Learning Course Denmark Numbers Det Centrale Personregister Det Centrale Virksomhedsregister DevOps Device Compatibility Dictionary Dictionary in C# Digital Economy Disaster Recovery for Web Applications Disaster-Proof Infrastructure Dmart Frenchise Dmart Home Delibery Dmart Mumbai Address Dmart Pickup Points Doodle Jump Drive Images On Blog Drive Images On Website Driver Problems DropDown Dropbox Dropdown jquery DynamoDB ETL ETL Package Ecommerce Store using AWS & React Embed Drive Images Escape Sequences in c#.Net Event Hub Explicit Join Extract Facebook App Fake CVR Denmark Fake DDV Slovenia Fake VAT Number Fake Virk Number Faker Feature Toggle Find CPR Information Find a Word on Website Firestore Flappy Bird Game Form Selectors using jQuery Free React Portfolio Template FreeCodeCamp Frontend Best Practices for Millions of Users Full Text Index View G Drive Hosting GAN certification course GCP Cloud Data Lake GCP Filestore GCP Functions GCP IAM GCP Persistent Disk Gemini Git Checkout Google Adsense Setting Google Beam Google BigQuery Google Conversion Tracking Google Docs Advanced Tutorial Google Drive Clone Google Drive Clone Bot Google Drive Clone HTML CSS Google Drive Clone PHP Google Drive Clone React Google Drive Clone Tutorial Google Drive Clone VueJS Google Drive File Sharing Google Drive Images Google Drive Sharing Permissions Grocery Price Compare Online Grocery in Corona Grocery in Covid19 Grofers vs DMart vs Big basket HAXM installation HTML Storage HTML to PDF Javascript HTML2Canvas HTML5 HTML5 Append Data HTML5 Audio HTML5 Data Storage HTML5 Storage HTML5 Video Harvard University AI Course Header Sent Height Jquery High Availability in Live Streaming Platforms High-Concurrency Frontend Design High-Concurrency Web Applications How to Search for a Word on Mac Html2Canvas Black Background issue Http Error 413 Http Error 500.35 IIS INNER Join Image Gallery Blogger Image Gallery Blogger Picasa Image Gallery Blogger Template Image Gallery Blogger Template Free Implicit Join Indexing in SQL Instagram Clone React Instagram Clone Script Install NodeJS Ubuntu Internet Infrastructure Interview IoT IoT Core IoT Hub JS Game Tutorial Java Feature Toggle Javascript game tutorial JioCinema Case Study Keep Me Login Key Management Kinesis Learn Scrappy with a live project List Live Streaming Data Delivery Live Streaming Performance Optimization Load Load Balancer Looping Dictionary MTech First Semester Syllabus MTech Syllabus MVC Mac Mac Finder Shortcut Media Controller Media Group Attribute Microservices Architecture for Scalability Missing MySQL Extension Mobile Optimization Multiple Audio Sync Multiple Video Sync Mumbai Dmart List MySQL MySQL ERD Generator Next.js Beginner Tutorial Ngnix NodeJS NodeJS Ubuntu Commands Numpy OOPS Concepts OOPS in C# Object Oriented Programming Object Storage Outer Join PHP Installation Error PHP WordPress Installation Error Pandas Personligt identifikations nummer Pipedrive Pipedrive Quickbooks Integration Portfolio Website using React Project Astra PyTorch Quickbooks Quote Generator RGPV Syllabus Download Random SSN Generator ReCaptcha Dumbass React Feature Toggle Real-Time Video Processing Architecture Real-Time Video Processing Backend RegExp Regular Expression Reinstall Bluetooth Drivers Remember Me Remove NodeJS Ubuntu Renew DHCP Lease Reset IP Address Linux Reset IP Address Mac Reset IP Address Windows Reset Remote Connection Reset Remote Connection Failure Resize Textarea Restore Errors Restore Failed UpdraftPlus Route 53 SOS Phone SQL Indexed Tables SQL Joins SQL Seed generator SQS SSIS Package SSIS Tutorial SSN Generator for Paypal SSN Number SSN Number Generator SSN Validator Safari 8 Safari Video Delay SageMaker Scalable Backend for High Concurrency Scalable Cloud Infrastructure for Live Streaming Scalable Frontend Architectures Scalable Live Streaming Architecture Scrapy course for beginners Search A word Search for a Word in Google Docs Secret Management Serverless Service Bus Slovenian VAT Generator SmartTube Software Architect Interview Questions Software Architect Mock Interview Sparse Checkout Spotlight Mac Shortcut Stored Procedure Subtree Merge T-Mobile IMEI Check TFS TMobile IMEI check unlock Team Foundation Server Terraform Associate Certification Training Free Text Search Text color Textarea Resize Jquery Theme Top WordPress Plugins Transform Trim javascript Troubleshooting TypeScript Beginner Tutorial Ubuntu Unleash Feature Toggle Update Computer Name UpdraftPlus 500 UpdraftPlus Backup Restore UpdraftPlus Error 500 UpdraftPlus Error 504 UpdraftPlus Error 524 UpdraftPlus HTTP Error UpdraftPlus New Domain UpdraftPlus Restore Not Working UpdraftPlus Troubleshooting Upstream Reset Error Use Google Drive Images VAT Number Generator Verizon imei check Verizon imei check paid off Verizon imei check unlock Verizon imei check\ Version Control Vertex AI Video View Indexing SQL Views in SQL Virksomhedsregister Virtual friends Visual Studio 2013 WHERE Clause WHPX expo Web Security Web scraping full course with project Web3 What is Feature Toggle WordPress Backup Troubleshooting WordPress Backup UpdraftPlus WordPress Database Backup WordPress Error 503 WordPress Installation Error WordPress Migration UpdraftPlus Wordpress Restore Workspaces Commands Your ip has been banned Zero Click angle between two points bing homepage quiz answers bing homepage quiz answers today bing homepage quiz not working bing homepage quiz reddit bing homepage quiz today byod Verizon imei check chatgpt essay example chatgpt essay writer chatgpt essay writing check tmobile imei contact form 7 captcha contact form 7 captcha plugin contact form 7 recaptcha v3 cpr-nummer engelsk cpr-nummer liste cpr-nummer register cpr-nummer tjek dbdiagram dom load in javascript dotnet core hosting bundle dotnet failed to load dotnet runtime error get url in php how to search for a word on a page how to search for a word on a page windows ipconfig release is cypress javascript istio transport failure jQuery AutoComplete jQuery Input Selector jQuery Menu jQuery Options joins in mySql jquery selector jquery selectors jsPDF jsPDF images missing key key-value keypress event in jQuery kubernetes upstream error localStorage metro by t-mobile imei check nemid cpr-nummer react native expo setup react native on Windows react native setup recaptcha v3 contact form 7 recaptcha wordpress contact form 7 reset connection failure resize control jQuery response code 403 smarttube round number in javascript select sessionStorage smarttube 403 エラー smarttube apk smarttube beta smarttube download smarttube reddit smarttube unknown source error 403 smartube sos iphone top right sos on iphone 13 sos only iphone substr substr in javascript tmobile imei tmobile imei check paid off tmobile imei number total by Verizon imei check trim trim jquery turn off sos iphone turn off sos on iphone 11 unknown source error 403 unknown source error response code 403 smarttube upstream connect error url in php view hidden files mac finder zuegQmMdy8M ошибка 403 smarttube
  • ()
  • ()
Show more
an "open and free" initiative. Powered by Blogger.